
- FileOptimizer: Offers extensive format support and granular control, ideal for advanced users needing deep customization.
- Image Compressor: Prioritizes simplicity and ease of use, perfect for quick, image-specific optimization tasks.
- Decision Factor: Choose based on your needs: FileOptimizer for control, Image Compressor for simplicity.
- Risks: Aggressive compression can lead to quality loss; online tools pose privacy concerns and often have ads.
- UniConverter: A robust alternative for efficient audio, video, and image compression, offering a balanced solution.
In this article
- Part 1: What is FileOptimizer and Image Compressor?
- Part 2: FileOptimizer: Core Features, Pros, and Cons
- Part 3: FileOptimizer: Ideal Users and Use Cases
- Part 4: FileOptimizer and Alternatives Comparison
- Part 5: Risks and Pitfalls to Consider
- Part 6: How to Use UniConverter for Efficient Audio and Video Compression
- Part 7: Conclusion
- Part 8: FAQs
When it comes to digital content, file size can be a real headache. Whether you're a professional dealing with high-resolution images or just someone trying to free up space on your device, efficient file compression is a necessity. This FileOptimizer Image Compressor review delves into two prominent tools in this space, FileOptimizer and Image Compressor, offering a detailed, scenario-based comparison. I'll explore their features, ideal use cases, and potential pitfalls, aiming to help you make an informed decision about which tool best suits your needs. From granular control for advanced users to straightforward simplicity for everyday tasks, understanding the nuances of these tools is key to optimizing your workflow and storage.
Part 1: What is FileOptimizer and Image Compressor?
In today's digital age, the sheer volume of data we create and consume daily makes file optimization an indispensable task. From high-resolution photos and videos to complex documents and software packages, large file sizes can quickly clog up storage, slow down uploads and downloads, and even impact website performance. This is where tools like FileOptimizer and Image Compressor come into play, designed to reduce file sizes without compromising essential quality. My goal in this review is to dissect these two tools, understanding their core functionalities, and ultimately guide you in choosing the most effective solution for your specific compression needs.
The Landscape of File Optimization Tools
* The Ever-Growing Need for Storage: With higher resolution cameras and richer media content, file sizes are constantly expanding, demanding efficient compression solutions.
* Performance and Bandwidth Constraints: Large files impact website loading times, email attachment limits, and overall system performance, making optimization crucial.
* Diverse User Requirements: From professional designers needing precise control to casual users seeking quick, simple solutions, the market demands a range of tools.
Part 2: FileOptimizer: Core Features, Pros, and Cons
FileOptimizer is a versatile and powerful file compression tool designed to reduce the size of various file types, not just images. It achieves this by re-optimizing and re-compressing files using a collection of external optimizers. Its strength lies in its ability to handle a wide array of formats, making it a go-to for users who need a comprehensive solution.
Core Features:
* Extensive Format Support: Compresses a vast range of file types including images (JPG, PNG, GIF), documents (PDF, DOCX, XLSX), executables, and archives.
* Lossless and Lossy Compression: Offers options for both lossless compression, preserving original quality, and lossy compression for maximum size reduction.
* Integration with Shell Context Menu: Allows for quick compression directly from Windows Explorer.
* Multi-threaded Processing: Utilizes multiple CPU cores for faster batch processing.
* Command-Line Interface: Provides flexibility for automation and scripting for advanced users.
Pros:
* Highly customizable compression settings for various file types, giving me granular control over the output.
* Open-source and completely free, offering transparency and community support, which is a huge plus for my budget.
* Batch processing capabilities for efficient handling of multiple files, saving me a lot of time.
Cons:
* Steep learning curve for beginners due to extensive options, I found it a bit overwhelming at first.
* User interface can feel outdated and less intuitive compared to modern alternatives, which can be a turn-off.
Part 3: FileOptimizer: Ideal Users and Use Cases
FileOptimizer caters to a specific segment of users who prioritize control and versatility over absolute simplicity. If you're someone who frequently deals with a diverse range of file types beyond just images and needs to fine-tune compression settings, this tool is definitely for you. I've found it invaluable in situations where I need to optimize entire project folders containing mixed media.
Best Use Case: Advanced Users Requiring Granular Control Over File Compression
As a developer, I often need to optimize various assets for web deployment, from images and PDFs to JavaScript files. FileOptimizer allows me to dive deep into the compression algorithms, choosing specific settings for each file type to achieve the perfect balance between file size and quality. For instance, when preparing a website for launch, I can use FileOptimizer to batch process all my images, documents, and even some code files, ensuring they are as small as possible without sacrificing visual fidelity or functionality. The ability to customize settings for different file types within a single application is incredibly powerful for my workflow.
Limited Use Case: Casual Users Needing Quick and Simple Image Optimization
If you're just looking to quickly shrink a few photos for social media or email, FileOptimizer might be overkill. The extensive options and somewhat dated interface can be daunting for someone who just wants a "one-click" solution. For example, if my mom just wants to compress a few vacation photos to send to friends, she would likely find FileOptimizer too complex and would prefer a simpler, more intuitive image-specific compressor. The learning curve for basic tasks is simply not worth it for casual users.
Part 4: FileOptimizer and Alternatives Comparison
When I'm looking for a file compression tool, I consider several factors beyond just the compression ratio. Ease of use, supported formats, and cost are all critical. Here's how FileOptimizer stacks up against some popular alternatives, including Image Compressor, TinyPNG, and Compressor.io.
| Feature/Scenario | FileOptimizer | Image Compressor | TinyPNG | Compressor.io |
| Compression Ratio | Excellent (highly configurable) | Good (preset options) | Very Good (smart lossy) | Excellent (lossy) |
| Ease of Use | Low (complex UI) | High (intuitive) | High (drag & drop) | High (drag & drop) |
| Supported Formats | Extensive (all types) | Image-focused (JPG, PNG) | Image-focused (PNG, JPG, WebP) | Image-focused (JPG, PNG, SVG, GIF) |
| Batch Processing | Yes | Yes | Yes (up to 20 files) | Yes (up to 10 files) |
| Cost | Free | Free/Freemium | Free/Freemium | Free/Freemium |
| Processing Speed | Moderate (local processing) | Fast (local/cloud) | Fast (cloud-based) | Fast (cloud-based) |
| Output Quality | User-defined | Good (preset options) | Excellent (perceptual) | Very Good (adjustable) |
Key Differentiators:
FileOptimizer excels in deep customization for advanced users, allowing me to fine-tune every aspect of compression for various file types. Image Compressor, on the other hand, prioritizes simplicity and ease of use, making it perfect for quick, image-specific tasks. For me, if I need to compress a PDF and a batch of photos, FileOptimizer is my go-to. However, if I just have a few JPEGs, Image Compressor or even TinyPNG are much faster and simpler. Compressor.io offers a good balance of quality and ease for images, but its batch limits can be restrictive.
Part 5: Risks and Pitfalls to Consider
While file compression tools are incredibly useful, it's important to be aware of the potential risks and pitfalls, especially when dealing with free or online services. I've encountered several issues over the years that have taught me to be cautious.
Potential Loss of Image Quality with Aggressive Compression
One of the biggest risks is the irreversible loss of image quality. If I set the compression level too high, especially with lossy compression, the resulting image can look pixelated, blurry, or have noticeable artifacts. While the file size might be significantly reduced, the visual integrity can be severely compromised, making the image unusable for its intended purpose. It's a delicate balance, and I always recommend backing up original files before aggressive compression.
Privacy Concerns with Online Compressors
When I upload my files to online compression tools, I'm essentially entrusting my data to a third-party server. This raises significant privacy concerns, especially if the files contain sensitive or confidential information. I always question how long these services store my files, who has access to them, and what security measures are in place. For critical data, I prefer desktop applications that process files locally.
Annoying Ads or Upsells in Freemium Models
Many free online compressors operate on a freemium model, which often means I'm bombarded with intrusive ads or constant prompts to upgrade to a paid version. These can significantly disrupt my workflow and create a frustrating user experience. Sometimes, the "free" version is so limited or ad-heavy that it's barely usable, pushing me towards alternatives.
Compatibility Issues with Certain File Formats
While many tools claim broad format support, I've occasionally run into compatibility issues. Some compressors might struggle with less common file types, or they might not apply the optimal compression algorithms, leading to suboptimal results or even corrupted files. It's crucial to test the tool with your specific file types before committing to a large batch process.
Lack of Customer Support for Free Tools
With free tools, especially open-source ones like FileOptimizer, dedicated customer support is often non-existent. If I encounter a bug, have a question, or need assistance, I'm usually left to scour forums or community pages for answers. This can be a significant drawback if I'm on a tight deadline and need immediate help.
Part 6: How to Use UniConverter for Efficient Audio and Video Compression
Sometimes, when other tools can’t keep up—whether because batch compression is limited, the results are inconsistent, or the output quality drops too much—I usually switch to UniConverter for a more reliable experience. It works especially well as a dedicated video compressor, while also supporting audio compression and image compression, which makes it a practical all-in-one media solution. I also like that it can help compress videos without quality loss as much as possible, while GPU acceleration improves speed and overall efficiency. With its broad format support and smoother workflow, it’s become a dependable option for everyday media compression and optimization.
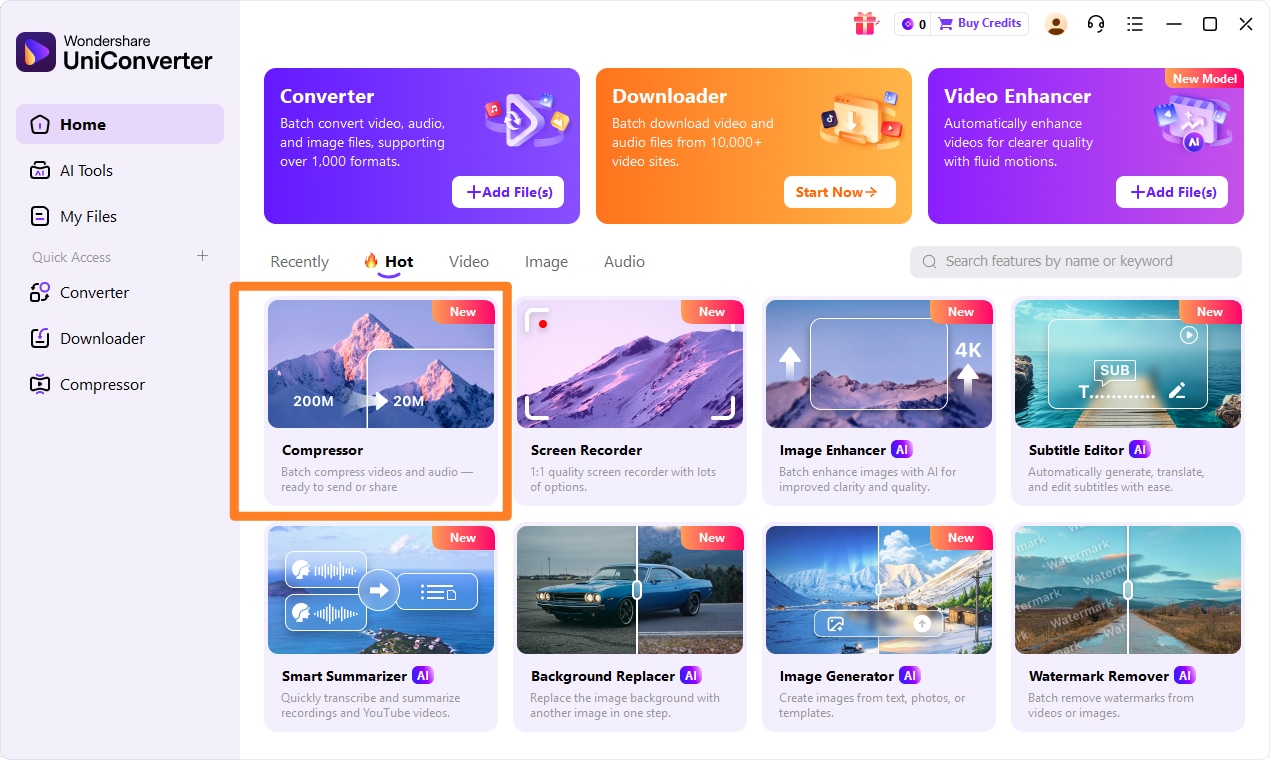
Step 1: Open UniConverter and Choose Compressor
First, I launch UniConverter on my desktop. On the main interface, I navigate to the "Toolbox" section and select the "Video Compressor" or "Image Converter" option, depending on what I need to optimize. This immediately sets me up for the right task.
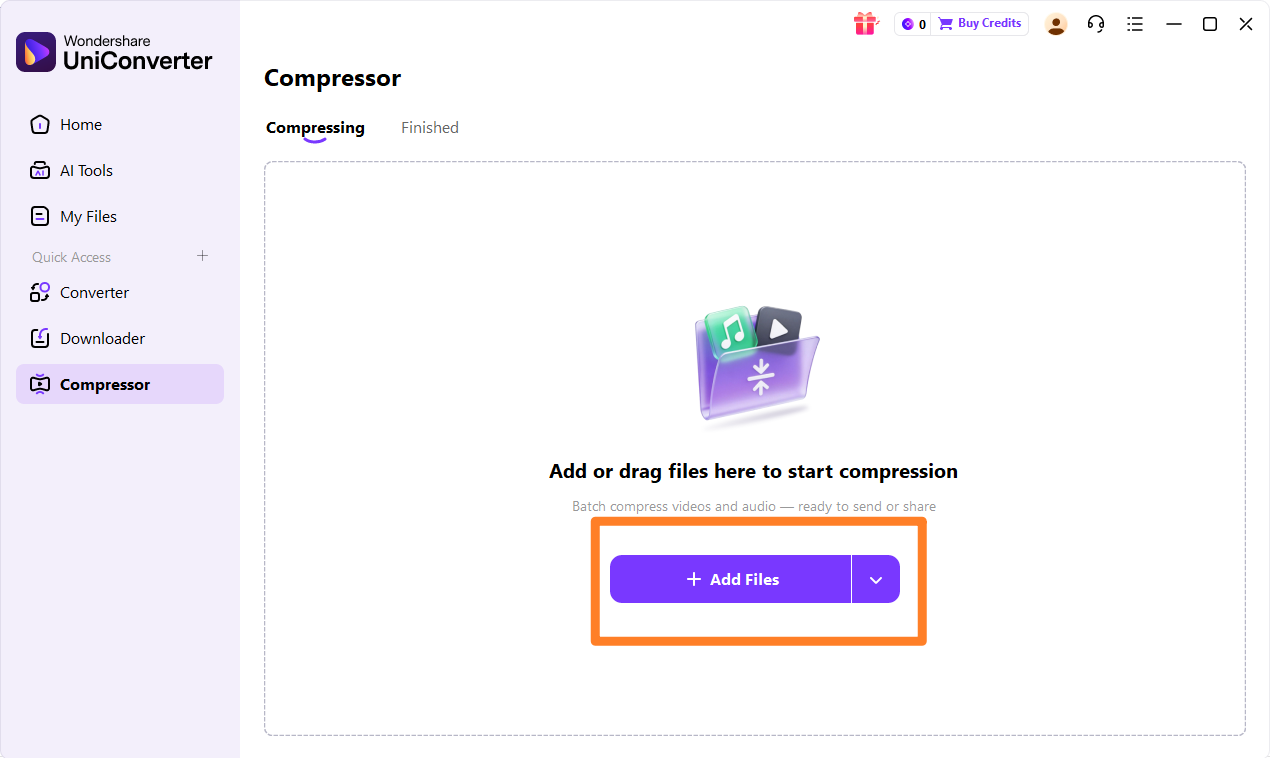
Step 2: Upload the Video, Audios or Images
Next, I click the "Add Files" button or simply drag and drop my video, audio, or image files into the designated area. UniConverter supports multiple files, so I can easily add a batch for compression.
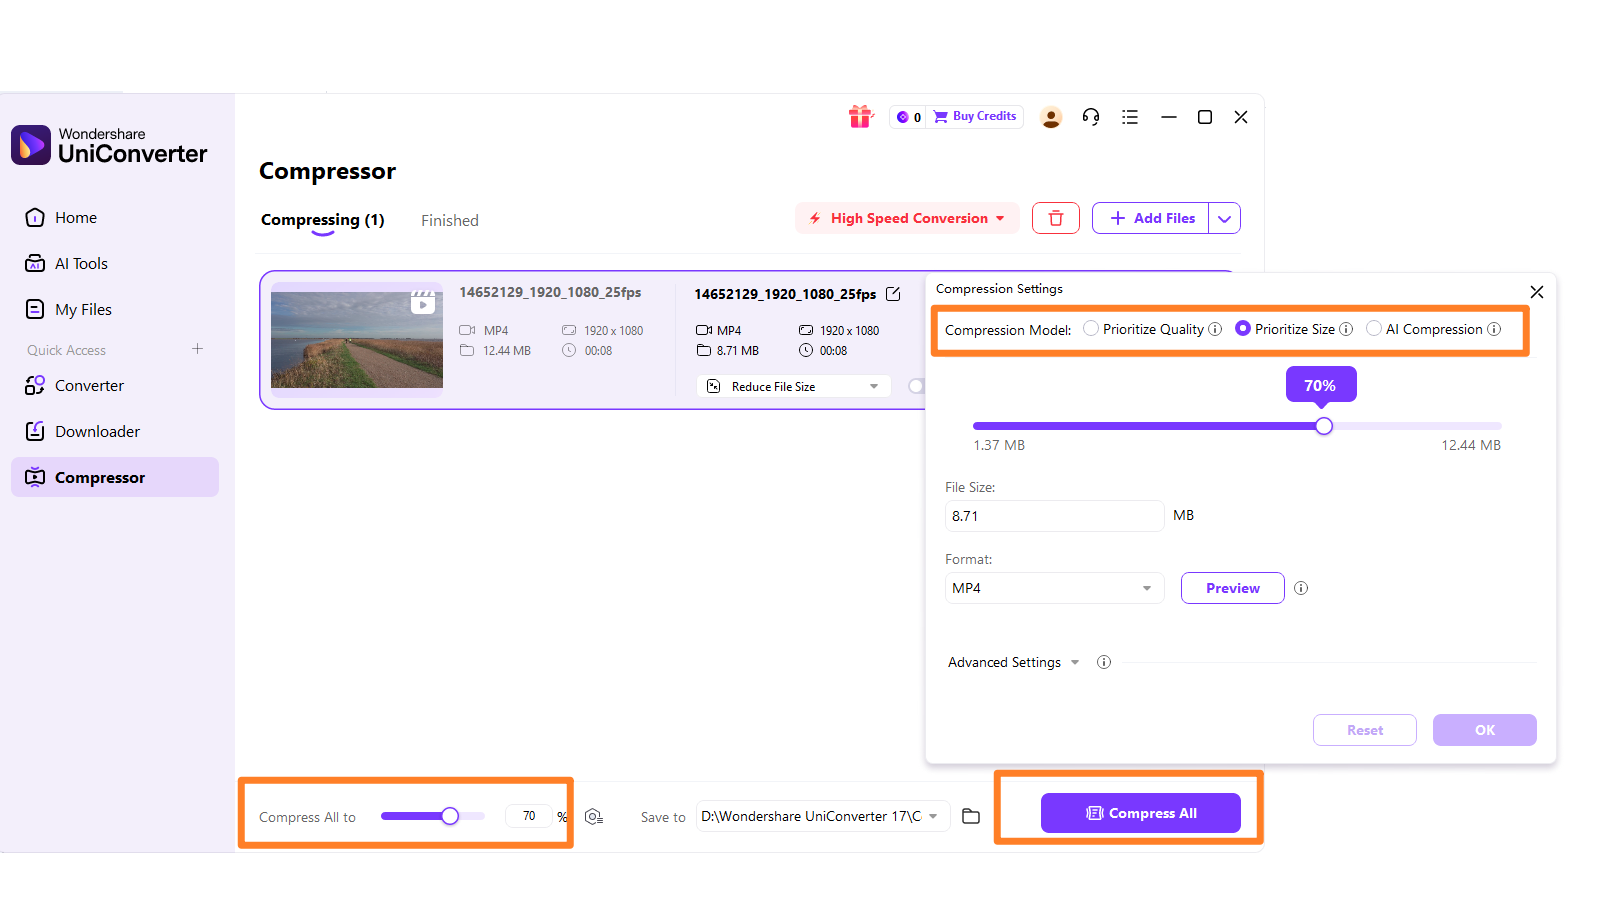
Step 3: Choose Required Parameters
Once my files are loaded, I can adjust the compression settings. For videos, I can select the output format, resolution, bitrate, and quality. For images, I can choose the output size and quality. UniConverter offers a preview function, allowing me to see the estimated file size and quality before committing.
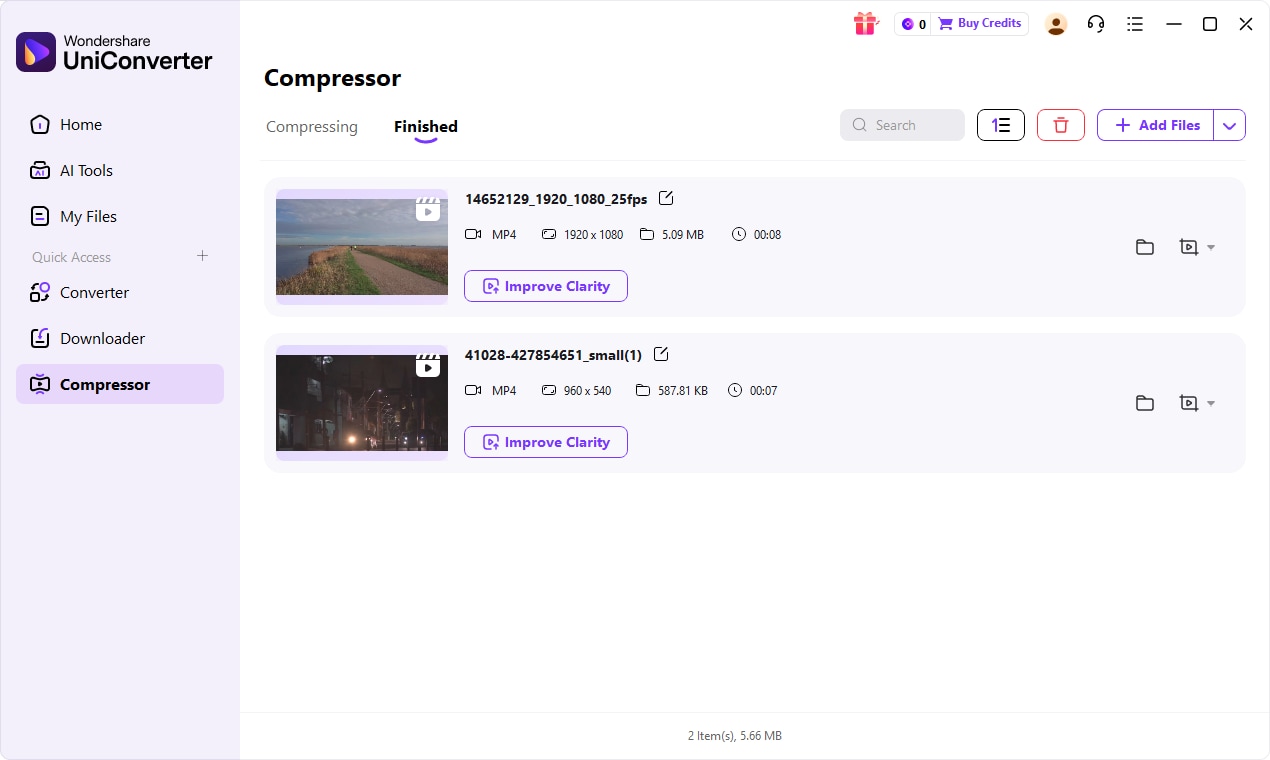
Step 4: Save the Compressed File
After setting my desired parameters, I click the "Compress" button. UniConverter quickly processes the files, and once completed, I can choose the output folder to save my optimized files. The process is straightforward and delivers excellent results.

Seeking a Powerful FileOptimizer Image Compressor Alternative?
Part 7: Conclusion
In this FileOptimizer Image Compressor review, I've explored two distinct approaches to file optimization. FileOptimizer stands out for its unparalleled customization and broad file type support, making it an indispensable tool for power users and developers who demand granular control over every compression parameter. Its open-source nature and cost-free access are significant advantages, though the learning curve and dated interface might deter casual users. Image Compressor, on the other hand, excels in simplicity and ease of use, perfectly suited for everyday image optimization tasks where quick results and an intuitive interface are prioritized. While it might lack the deep customization of FileOptimizer, its focus on image-specific compression makes it highly efficient for its niche. For those seeking a more balanced and comprehensive solution, especially when dealing with a mix of videos, audios, and images, UniConverter emerges as a strong contender, offering a user-friendly interface, robust features, and reliable performance without the common pitfalls of free tools. Ultimately, the best choice depends on your specific needs: control for the advanced, simplicity for the casual, or a versatile all-in-one for broader media management.
Part 8: FAQs
-
1. Is FileOptimizer safe to use?
Yes, FileOptimizer is open-source and generally considered safe, but I always recommend downloading it from the official source to ensure you get the legitimate version.
-
2. Does Image Compressor reduce image quality significantly?
It depends on the compression level you choose. Higher compression will inevitably lead to some quality loss. I usually test different settings to find the best balance between file size and visual quality for my needs.
-
3. Can I compress videos with FileOptimizer?
While FileOptimizer can process video files, its primary strength lies in general file optimization, not dedicated video compression. For more effective video compression, I'd suggest a specialized tool like UniConverter.
-
4. What are the main advantages of using a dedicated image compressor over a general file optimizer?
Dedicated image compressors often offer more image-specific optimization algorithms and a simpler interface for image tasks, making them quicker and easier to use for just photos.
-
5. Is UniConverter a free tool?
UniConverter offers a free trial with limited features, and a paid version for full access. I find the paid version worth it for its comprehensive features and ad-free experience, especially when I need to handle various media types.
