
- Canva Compressor: Integrated, free, and user-friendly for quick, basic image compression within Canva designs.
- Limited Control: Canva lacks advanced settings, potentially degrading quality for aggressive compression needs.
- Best Use: Ideal for social media and web graphics requiring fast, convenient file size reduction.
- Professional Gap: Insufficient for high-resolution photography or print media needing precise quality control.
- Competitor Edge: Tools like TinyPNG, JPEGmini, and UniConverter offer superior quality, batch processing, and advanced features.
- Online Risks: Be wary of data privacy, intrusive ads, irreversible quality loss, and file size limits with free online tools.
- UniConverter Advantage: Offers offline, ad-free, batch processing with advanced control for superior, near-lossless compression.
- Decision Factor: Choose based on workflow (Canva integration vs. dedicated tool), quality needs, and batch processing requirements.
In this article
- Part 1: What is Canva Image Compressor?
- Part 2: Canva Image Compressor: Core Features, Pros, and Cons
- Part 3: Canva Image Compressor: User and Usage Scenarios
- Part 4: Canva Image Compressor vs. Competitors: A Head-to-Head Battle
- Part 5: Risks and Pitfalls to Avoid When Using Online Image Compressors
- Part 6: How to Use UniConverter to Compress Efficiently
- Part 7: Final Verdict and Recommendations
- Part 8: Frequently Asked Questions (FAQs)
The Ultimate Guide to Canva Image Compressor: Features, Alternatives, and Best Practices
When you're creating stunning visuals, whether for social media, a website, or a presentation, image file size can quickly become a bottleneck. Large images slow down page loading times, consume bandwidth, and can even impact your search engine rankings. This is where image compressors come in, and Canva, a household name in graphic design, offers its own solution. This Canva Image Compressor review will delve into its capabilities, compare it with leading alternatives, and provide practical advice to help you make informed decisions about optimizing your images. I'll explore its features, highlight its strengths and weaknesses, and guide you through various scenarios to determine if it's the right tool for your needs.
Part 1: What is Canva Image Compressor?
Canva Image Compressor is an integrated feature within the popular online graphic design platform, Canva, designed to reduce the file size of images without significantly compromising visual quality. It allows users to quickly optimize their images directly within their design workflow, making it a convenient option for those already using Canva for their creative projects. The primary goal of this tool is to ensure that your designs load faster on the web and consume less storage space, which is crucial for maintaining a smooth user experience and efficient digital asset management. This review aims to address the core question: how effective is Canva's compressor compared to dedicated image optimization tools, and when should you choose one over the other?
The Rise of Online Image Compression Tools
The increasing demand for fast-loading websites and efficient digital content has fueled the growth of online image compression tools.
* Website Performance: Large image files are a major contributor to slow website loading times, impacting user engagement and SEO.
* Storage and Bandwidth: Optimizing images reduces storage costs and conserves bandwidth, especially for platforms with high traffic.
* Mobile Responsiveness: Smaller image files are essential for ensuring a smooth experience on mobile devices with varying network speeds.
* Ease of Use: Online tools offer a quick and accessible way for users without specialized software to compress images.
Part 2: Canva Image Compressor: Core Features, Pros, and Cons
Canva Image Compressor is a straightforward tool primarily focused on ease of use and integration within the Canva ecosystem. Its core capability lies in reducing image file sizes, making them more suitable for web and digital use. It supports common image formats like JPG, PNG, and WebP, allowing for basic compression adjustments.
Core Features:
* Integrated Workflow: Directly accessible within Canva's design interface.
* Multiple Format Support: Handles JPG, PNG, and WebP images.
* Quality Slider: Offers a simple slider to adjust compression levels.
* Preview Function: Allows you to see the compressed image before downloading.
* Automatic Compression: Can automatically suggest an optimized file size.
Pros:
* Seamless integration with Canva's design ecosystem: If you're already designing in Canva, it's incredibly convenient.
* User-friendly interface for quick compression: No technical expertise required; just a few clicks.
* Free for basic usage: Accessible to all Canva users without additional cost.
Cons:
* Limited advanced compression options: Lacks granular control over specific compression algorithms or metadata.
* Potential quality degradation for aggressive compression: Pushing the compression too far can noticeably reduce image clarity.
Part 3: Canva Image Compressor: User and Usage Scenarios
Canva Image Compressor is specifically designed for users who prioritize convenience and speed within their existing Canva workflow. It's not built for highly specialized or professional image optimization tasks, but rather for everyday needs where a quick reduction in file size is sufficient.
Best Use Case: Quick Compression for Social Media and Web Design
I find Canva Image Compressor incredibly useful when I'm creating graphics for my social media channels or designing simple web pages. For instance, if I've just finished a new Instagram post or a banner for my blog, and the image file is a bit too large, I can quickly compress it right there in Canva before downloading. This saves me the hassle of exporting, opening another tool, compressing, and then re-uploading. It's perfect for when I need to ensure my images load fast on platforms where visual quality is important but not hyper-critical, and file size directly impacts performance.
Limited Use Case: Professional Photography or Print Media
However, I would never rely on Canva Image Compressor for professional photography or print media. When I'm preparing high-resolution images for a client's portfolio or a print magazine, I need absolute control over every aspect of the compression process to preserve maximum detail and color accuracy. Canva's tool simply doesn't offer the advanced settings required for such demanding tasks, like specific color profiles, lossless compression options, or detailed metadata control. For these scenarios, I turn to dedicated professional software that provides the precision needed to avoid any noticeable quality loss.
Part 4: Canva Image Compressor vs. Competitors: A Head-to-Head Battle
When it comes to image compression, Canva Image Compressor offers convenience, but it's important to see how it stacks up against more specialized tools. I've put it side-by-side with some popular alternatives to give you a clearer picture.
| Feature/Tool | Canva Image Compressor | TinyPNG | JPEGmini | UniConverter |
| Ease of Use | High | High | Medium | High |
| Advanced Settings | Low | Medium | Medium | High |
| Batch Processing | No | Yes | Yes | Yes |
| Output Quality | Good | Excellent | Excellent | Excellent |
| Price | Free (basic) | Free (basic) | Paid | Free (basic) |
Key Differentiators: Integration vs. Specialization
From my experience, Canva Image Compressor shines in its integration. If you're already knee-deep in a Canva design, it's the most convenient option for a quick file size reduction. However, for anything beyond basic needs, tools like TinyPNG and JPEGmini offer better output quality and more control, especially for web optimization. TinyPNG is fantastic for its intelligent compression, often yielding smaller files with minimal perceived quality loss. JPEGmini, while paid, is excellent for photographers who need to maintain high quality while significantly reducing file size. UniConverter, on the other hand, stands out for its comprehensive features, including batch processing and advanced settings, making it a more versatile solution for users who need to handle a high volume of images or require more specific compression parameters.
Part 5: Risks and Pitfalls to Avoid When Using Online Image Compressors
While online image compressors offer incredible convenience, I've learned that they come with their own set of risks and potential pitfalls that you should be aware of before entrusting them with your valuable images. It's not just about getting a smaller file; it's also about protecting your data and ensuring quality.
Data Privacy Concerns
When I upload my images to an online compressor, I always consider the privacy implications. Many free tools might store your images temporarily, or even worse, use them for their own purposes, such as training AI or displaying them in public galleries. I always check the privacy policy to understand how my data is handled. For sensitive or proprietary images, I'm extremely cautious and prefer offline solutions.
Unwanted Advertisements and Pop-ups
A common trade-off for free online services is the bombardment of ads. I've encountered numerous compressors that are riddled with intrusive pop-ups, banner ads, and even redirects to unrelated sites. This not only disrupts the workflow but can also pose security risks if the ads are malicious. It's a frustrating experience that often makes me question if the "free" service is truly worth the annoyance.
Irreversible Quality Loss
This is perhaps the most critical pitfall. While the goal is to reduce file size, some aggressive compressors can lead to irreversible quality degradation. I've seen images come out pixelated, with color banding, or a noticeable loss of detail, especially in areas with fine textures or gradients. Once the quality is lost, there's no going back. It's crucial to always keep a backup of your original image and to preview the compressed version carefully before committing.
File Size Limitations
Many free online compressors impose strict file size or dimension limits. I've often hit a wall when trying to compress a large batch of high-resolution images, only to be told I need to upgrade to a paid plan or process them one by one. This can be a significant bottleneck if you're dealing with a substantial number of files.
Lack of Offline Functionality
One major drawback for me is the reliance on an internet connection. If I'm working offline or in an area with poor connectivity, these tools become useless. This lack of offline functionality can severely hinder productivity, especially for professionals who might need to optimize images on the go or in environments without reliable internet access.
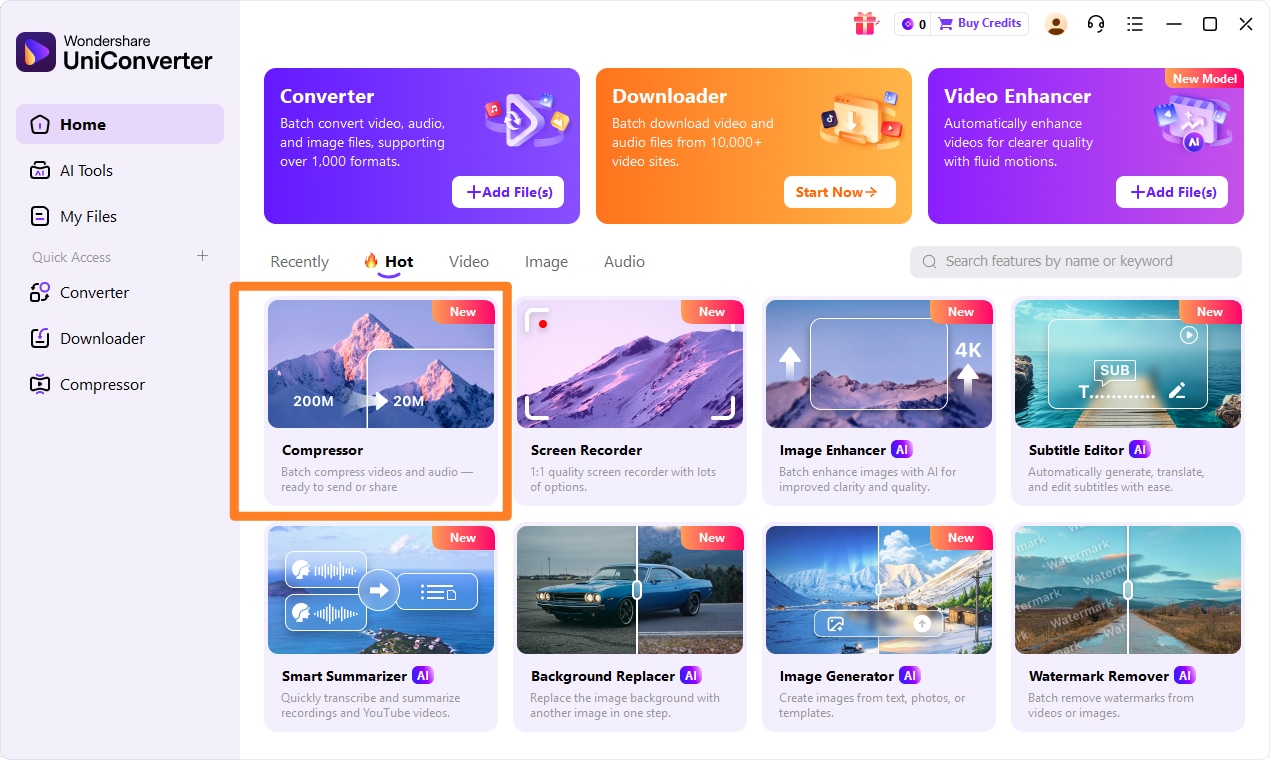
Part 6: How to Use UniConverter to Compress Efficiently
A desktop solution makes far more sense once online compressors start showing their limits, whether that means weak batch support, uneven results, or too much quality loss. That’s why I often rely on UniConverter, which gives me a smoother way to handle image compression, video compression, and audio compression in one place. I also like that it runs without the usual distractions of ad-heavy web tools, supports a wide range of formats, and uses GPU acceleration to speed up larger jobs. For video files in particular, it can even help compress videos without quality loss as much as possible, which makes it a practical all-in-one choice for more reliable media optimization.
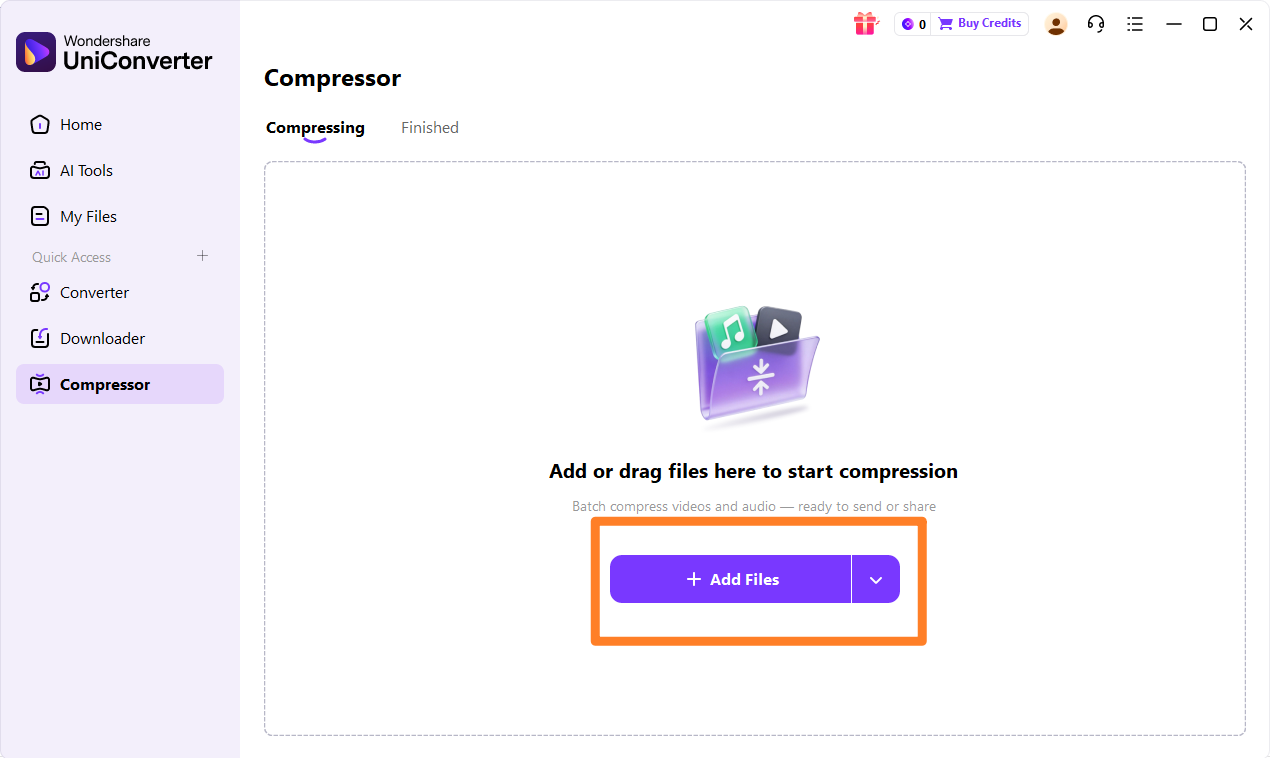
Step 1: Open UniConverter and Choose Compressor
First, I launch UniConverter on my desktop. On the left-hand sidebar, I navigate to the "Toolbox" section and select the "Image Compressor" option. This brings me to the dedicated compression interface.
Step 2: Upload the Video, Audios or Images
Next, I click the "Add Files" button or simply drag and drop the images, videos, or audio files I want to compress into the UniConverter window. I can add multiple files at once for batch processing.
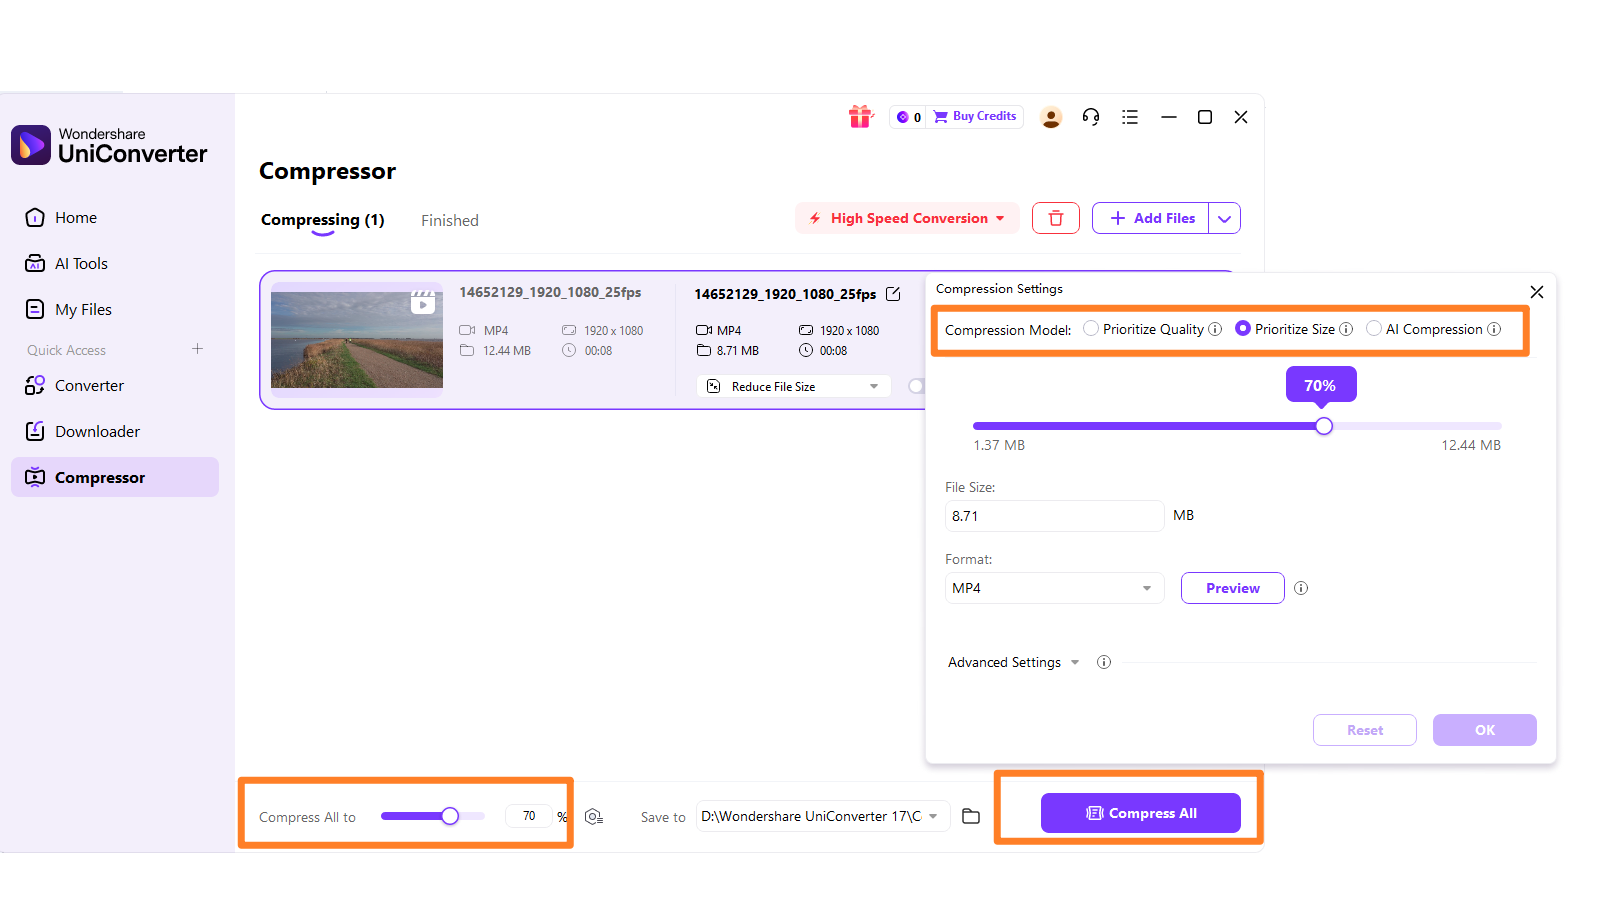
Step 3: Customize Compression Settings
UniConverter allows me to customize the compression settings. I can choose the output format, adjust the quality slider, and even resize the images if needed. For videos and audio, I can select specific codecs and bitrates.
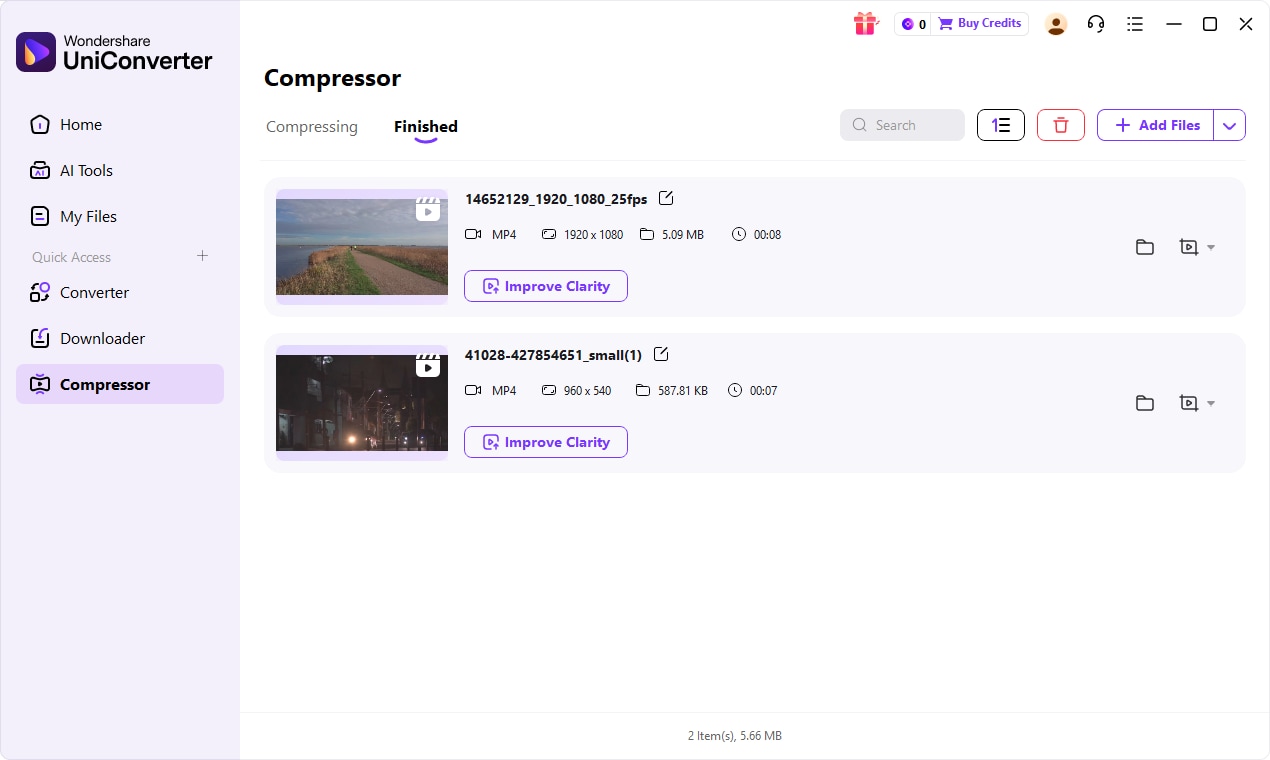
Step 4: Save the Compressed File
Once I'm satisfied with the settings, I click the "Compress" button. UniConverter quickly processes the files, and then I can choose the destination folder to save my optimized images, videos, or audio.

Seeking a Better Canva Image Compressor Alternative?
Part 7: Final Verdict and Recommendations
After extensively exploring the Canva Image Compressor review and its alternatives, it's clear that the "best" tool depends entirely on your specific needs and workflow. Canva's offering is a testament to convenience and integration, perfectly suited for a particular segment of users. However, for those with more demanding requirements, specialized tools offer superior control and quality.
For casual users and Canva enthusiasts, the Canva Image Compressor is an excellent, hassle-free option. If you're already designing within Canva and need a quick reduction in file size for social media posts, blog images, or simple web graphics, its seamless integration makes it incredibly efficient. You won't need to leave your design environment, and for basic optimization, it performs adequately without any additional cost. It's ideal for those who prioritize speed and simplicity over granular control.
For professionals and those with batch processing needs, I highly recommend looking beyond Canva. Tools like TinyPNG, JPEGmini, or especially UniConverter, provide the advanced features necessary to handle large volumes of images while maintaining high quality. If you're a web developer, a professional photographer, or someone who frequently optimizes many images, the ability to batch process, fine-tune compression settings, and ensure minimal quality loss is paramount. These tools offer the precision and efficiency that Canva's compressor lacks for professional-grade work.
Finally, for offline and advanced control, a dedicated desktop application like UniConverter is the clear winner. It eliminates concerns about internet connectivity, data privacy, and intrusive ads, providing a secure and powerful environment for all your image, video, and audio compression needs. If you require the utmost control over your compression parameters, support for a wide range of formats, and the ability to work without an internet connection, investing in a robust offline solution will undoubtedly yield the best results.
Part 8: Frequently Asked Questions (FAQs)
-
1. Is Canva Image Compressor completely free to use?
Yes, the basic functionality of Canva Image Compressor is included with your free Canva account. You can compress images directly within your designs or by uploading them to the compressor tool.
-
2. Does image compression affect SEO?
Absolutely. Optimized images with smaller file sizes load faster, which is a significant factor in search engine rankings. Faster loading times improve user experience, reduce bounce rates, and signal to search engines that your site is efficient, all contributing to better SEO.
-
3. Can I compress multiple images at once with Canva?
Canva's built-in image compressor generally handles one image at a time within a design. If you need to compress multiple images in a batch, you'll find that dedicated tools like UniConverter or TinyPNG offer more efficient batch processing capabilities.
-
4. What's the best image format for web use after compression?
For general web use, JPEG is excellent for photographs due to its efficient compression of complex images. PNG is better for images with transparency or sharp edges, like logos and illustrations, as it's lossless. WebP is increasingly popular as it offers superior compression for both photographic and graphic images, often resulting in smaller file sizes than JPEGs or PNGs at comparable quality.
-
5. How much quality loss should I expect with image compression?
The amount of quality loss depends on the compression level you choose and the tool you use. Good compressors aim for "perceptual quality," meaning they reduce file size by removing data that is least noticeable to the human eye. With tools like UniConverter, you can often achieve significant file size reductions with virtually no visible quality loss, especially when using intelligent compression algorithms.
