
- Camtasia Compressor: Integrated within Camtasia, ideal for screen recordings, offering user-friendly presets for quick optimization.
- Value Proposition: Excellent for educators and content creators needing an all-in-one recording, editing, and basic compression solution.
- Limitations: Lacks advanced codec control and batch processing of dedicated tools; higher cost as part of a full suite.
- Alternatives Comparison: HandBrake offers advanced control (free), Adobe Media Encoder for professionals, UniConverter balances ease and features.
- Decision Factor: Choose Camtasia for integrated workflow; UniConverter for robust, user-friendly compression; HandBrake for advanced free control.
In this article
- Part 1: What is Camtasia Video Compressor?
- Part 2: Camtasia Video Compressor: Core Features, Pros, and Cons
- Part 3: Camtasia Video Compressor: Ideal Use Cases and Limitations
- Part 4: Camtasia Video Compressor and Alternatives Comparison
- Part 5: Risks and Pitfalls to Consider
- Part 6: How to Use UniConverter to Efficiently Compress Video and Audio
- Part 7: Conclusion
- Part 8: FAQs
Camtasia Video Compressor: A Comprehensive Scenario-Based Review
When I first started creating online tutorials and educational content, I quickly realized the challenge of managing large video files. Uploading them to platforms like YouTube or my university's learning management system was a nightmare, often taking hours. That's when I stumbled upon Camtasia, a popular all-in-one screen recording and video editing software. While its primary strength lies in content creation, I soon discovered its built-in video compressor. This Camtasia Video Compressor review will delve into its capabilities, comparing it against dedicated compression tools and helping you understand if it's the right solution for your video compression needs. I'll share my experiences and insights to guide your decision-making process.
Part 1: What is Camtasia Video Compressor?
Camtasia is renowned as a comprehensive screen recording and video editing suite, particularly favored by educators, trainers, and content creators for its user-friendly interface and integrated workflow. The Camtasia Video Compressor isn't a standalone product; rather, it's an integral feature within the Camtasia software, designed to optimize video file sizes during the export process. My initial encounter with it was out of necessity – I needed to shrink my lengthy screencasts without sacrificing too much quality for online distribution. This review aims to address the core question: how effective is Camtasia's built-in compressor when stacked against specialized compression tools, and for whom is it the ideal solution?
Addressing Key User Pain Points:
* Large File Sizes: Uncompressed video files can be enormous, making sharing and uploading cumbersome.
* Slow Upload/Download Times: Large files directly translate to longer transfer times, impacting user experience.
* Storage Constraints: Managing numerous high-resolution videos can quickly eat up valuable storage space.
* Platform Compatibility: Different platforms have varying file size and format requirements, necessitating efficient compression.
Part 2: Camtasia Video Compressor: Core Features, Pros, and Cons
The Camtasia Video Compressor, as part of the larger Camtasia suite, offers a streamlined approach to reducing video file sizes. Its core capabilities revolve around its integration with the editing workflow, allowing me to record, edit, and then compress my videos all within one application.
Core Features:
* Integrated Export Presets: Offers various presets optimized for different platforms (e.g., YouTube, Vimeo) and quality levels.
* Customizable Export Settings: Allows adjustment of video dimensions, frame rate, quality slider, and audio bitrate.
* Smart Encoding: Utilizes intelligent algorithms to reduce file size while attempting to maintain visual fidelity.
* MP4 Output: Primarily exports to the widely compatible MP4 format.
* Direct Upload Options: Facilitates direct uploads to platforms like YouTube and Screencast.com after compression.
Pros:
* Intuitive Interface for Beginners: As someone who isn't a professional video editor, I found the compression settings easy to navigate and understand.
* Integrated Recording and Editing Workflow: The seamless transition from editing to compression within the same software saves me a lot of time and hassle.
* Excellent for Screencast Optimization: For my educational content, which often involves screen recordings, the compressor does a fantastic job of reducing file sizes without noticeable quality loss for typical viewing.
Cons:
* Limited Advanced Compression Options: I've noticed that for more granular control over codecs, bitrates, and advanced settings, Camtasia falls short compared to dedicated tools.
* Higher Price Point Compared to Dedicated Compressors: Since it's part of a full editing suite, the cost is significantly higher than free or low-cost standalone compressors.
Part 3: Camtasia Video Compressor: Ideal Use Cases and Limitations
From my experience, the Camtasia Video Compressor shines in specific scenarios, while in others, its limitations become quite apparent.
Best Use Case: Educational Content Creators and Corporate Trainers
Scenario: I, as a university lecturer, frequently need to compress 30-minute lecture recordings that include screen sharing, webcam footage, and annotations. These videos are destined for online course delivery platforms like Moodle or Canvas. Camtasia's integrated workflow is a lifesaver here. I can quickly edit out mistakes, add quizzes, and then, with a few clicks, export the video using one of Camtasia's optimized presets. The compressor ensures the video is high quality enough for students to follow along, yet small enough to upload quickly and stream smoothly, which is crucial for a positive learning experience.
Limited Use Case: Professional Video Editors with Large 4K Footage
Scenario: Imagine I'm a professional videographer working on a client project, and I need to significantly reduce the file size of multiple 4K drone shots for client review. These shots are visually rich and demand extreme fidelity. Camtasia's compression algorithms, while good for screencasts, might not offer the granular control over advanced codecs (like H.265 with specific profiles) or bitrates that I'd need to achieve the absolute smallest file size without any perceptible quality degradation. I've found that using Camtasia for such high-fidelity, large-scale projects can lead to compromises in visual quality or result in larger-than-desired file sizes compared to what dedicated professional tools can achieve.
Part 4: Camtasia Video Compressor and Alternatives Comparison
When I look at the landscape of video compression tools, the Camtasia Video Compressor occupies a unique niche. Here's how it stacks up against some popular alternatives:
| Feature/Scenario | Camtasia Video Compressor | HandBrake | Adobe Media Encoder | UniConverter |
| Ease of Use (Beginner) | Excellent | Moderate | Advanced | Excellent |
| Integrated Workflow (Record/Edit/Compress) | Yes | No | No (integrates with Adobe Suite) | Yes (limited editing) |
| Advanced Codec Support | Basic | Excellent (H.264, H.265, VP8/9) | Excellent (ProRes, DNxHD, H.264, H.265) | Good (H.264, H.265, VP8/9) |
| Batch Processing | Limited | Excellent | Excellent | Excellent |
| Price | High (part of suite) | Free | High (subscription) | Moderate (one-time/subscription) |
| Target User | Educators, Trainers | Tech-savvy users | Professionals | General users, Small businesses |
Key Differentiators:
Camtasia truly excels as an all-in-one solution for screencasting and basic compression, perfect for my educational content. HandBrake, on the other hand, is my go-to for powerful, free compression when I need more control, though it has a steeper learning curve. Adobe Media Encoder is indispensable for professional-grade compression within the Adobe ecosystem, offering unparalleled control and codec support. UniConverter provides a fantastic balance, offering a user-friendly interface with a good range of features for various users, and I often recommend it for those who need more than Camtasia but less complexity than HandBrake or AME.
Part 5: Risks and Pitfalls to Consider
When I'm compressing videos, especially with a tool like Camtasia that's part of a larger suite, I always keep an eye out for potential issues. It’s not just about getting a smaller file; it’s about maintaining quality and ensuring my workflow remains smooth.
Potential Quality Loss with Aggressive Compression
One of the biggest risks I've encountered is the temptation to compress too aggressively. While Camtasia offers quality sliders and presets, pushing them too far can lead to noticeable pixelation, artifacting, and a general degradation of video quality. For my lectures, if the text on the screen becomes blurry, it defeats the purpose. It's a delicate balance, and I've learned to always preview the compressed output before finalizing.
Subscription Model vs. One-Time Purchase Value
Camtasia, being a premium software, comes with a significant upfront cost or a subscription model. While I appreciate its integrated features, I have to constantly evaluate if the value I get from its compressor justifies the overall price, especially when there are free alternatives like HandBrake. For someone who only needs occasional compression, this cost can be a major pitfall.
Limited Codec and Format Support for Niche Needs
While Camtasia handles MP4 perfectly fine for most of my needs, I've found its codec and format support to be somewhat limited for more niche requirements. If I ever needed to output to a less common format or utilize a specific advanced codec for a very particular project, Camtasia might not offer those options, forcing me to use additional software. This can disrupt my workflow and add extra steps.
Performance Impact on Older Hardware
I've also noticed that running Camtasia, especially during the compression phase, can be quite demanding on my older laptop. The software can become sluggish, and the compression process takes significantly longer. This performance impact is a real consideration if you're working with large files on less powerful hardware, potentially leading to frustration and lost time.
Part 6: How to Use UniConverter to Efficiently Compress Video and Audio
Sometimes, when tools like Camtasia feel limiting—especially if batch compression is missing, results are inconsistent, or the output quality drops too much—I usually switch to UniConverter for a more reliable workflow. It works especially well as a dedicated video compressor, offering a cleaner and more user-friendly experience with broad format support and GPU acceleration for faster processing. I also like that it can help compress videos without quality loss as much as possible, which is useful when preserving video clarity matters. Since it also supports audio compression and image compression, it works well as a practical all-in-one solution for handling different types of media files.
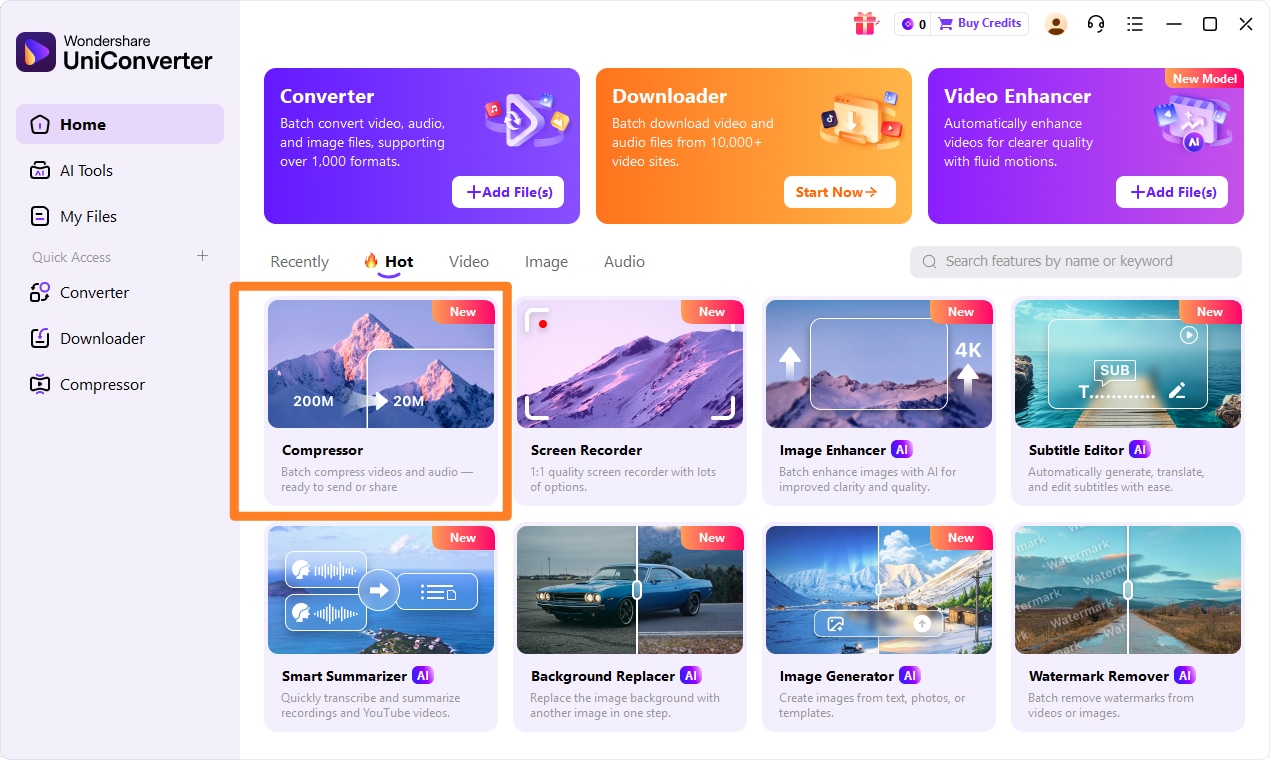
Step 1: Open UniConverter and Choose Compressor
I start by launching UniConverter and navigating to the "Compressor" tool from the main interface.
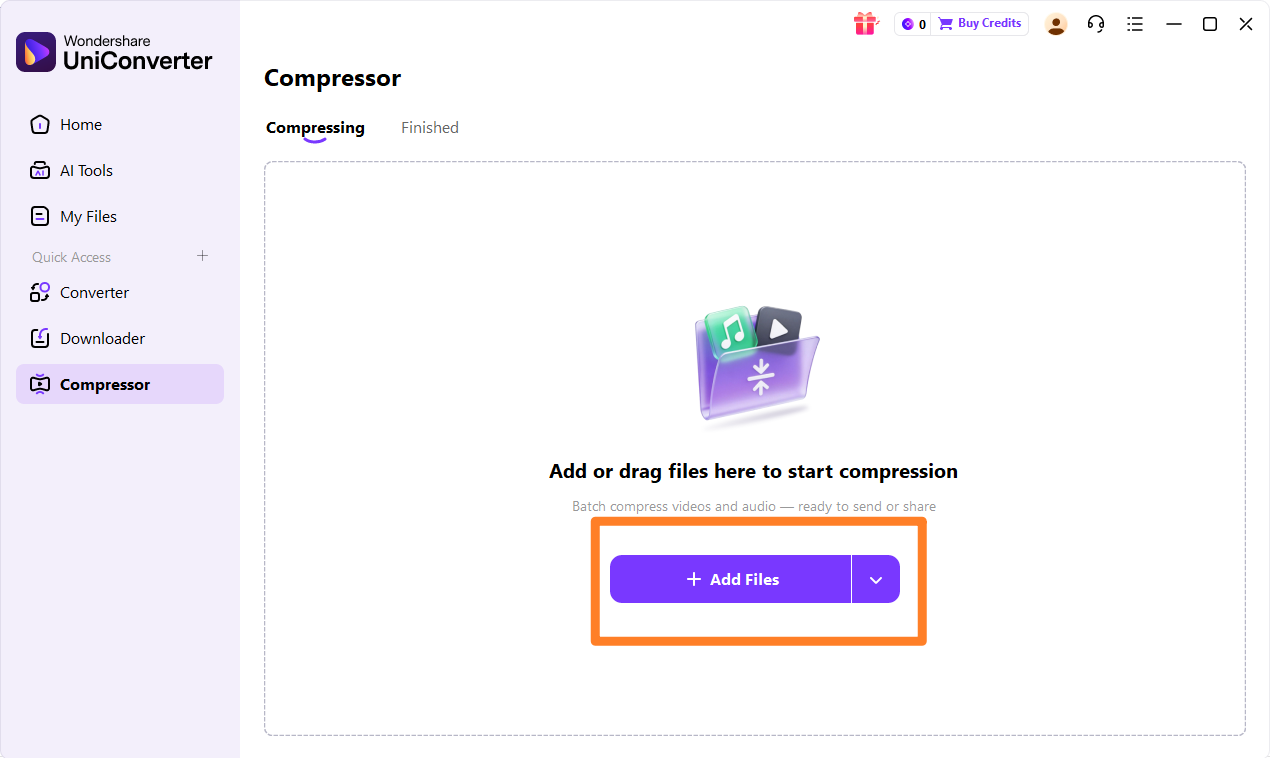
Step 2: Upload the Video, Audios or Images
Next, I drag and drop my video, audio, or image files directly into the UniConverter window, or I can click "Add Files" to browse for them.
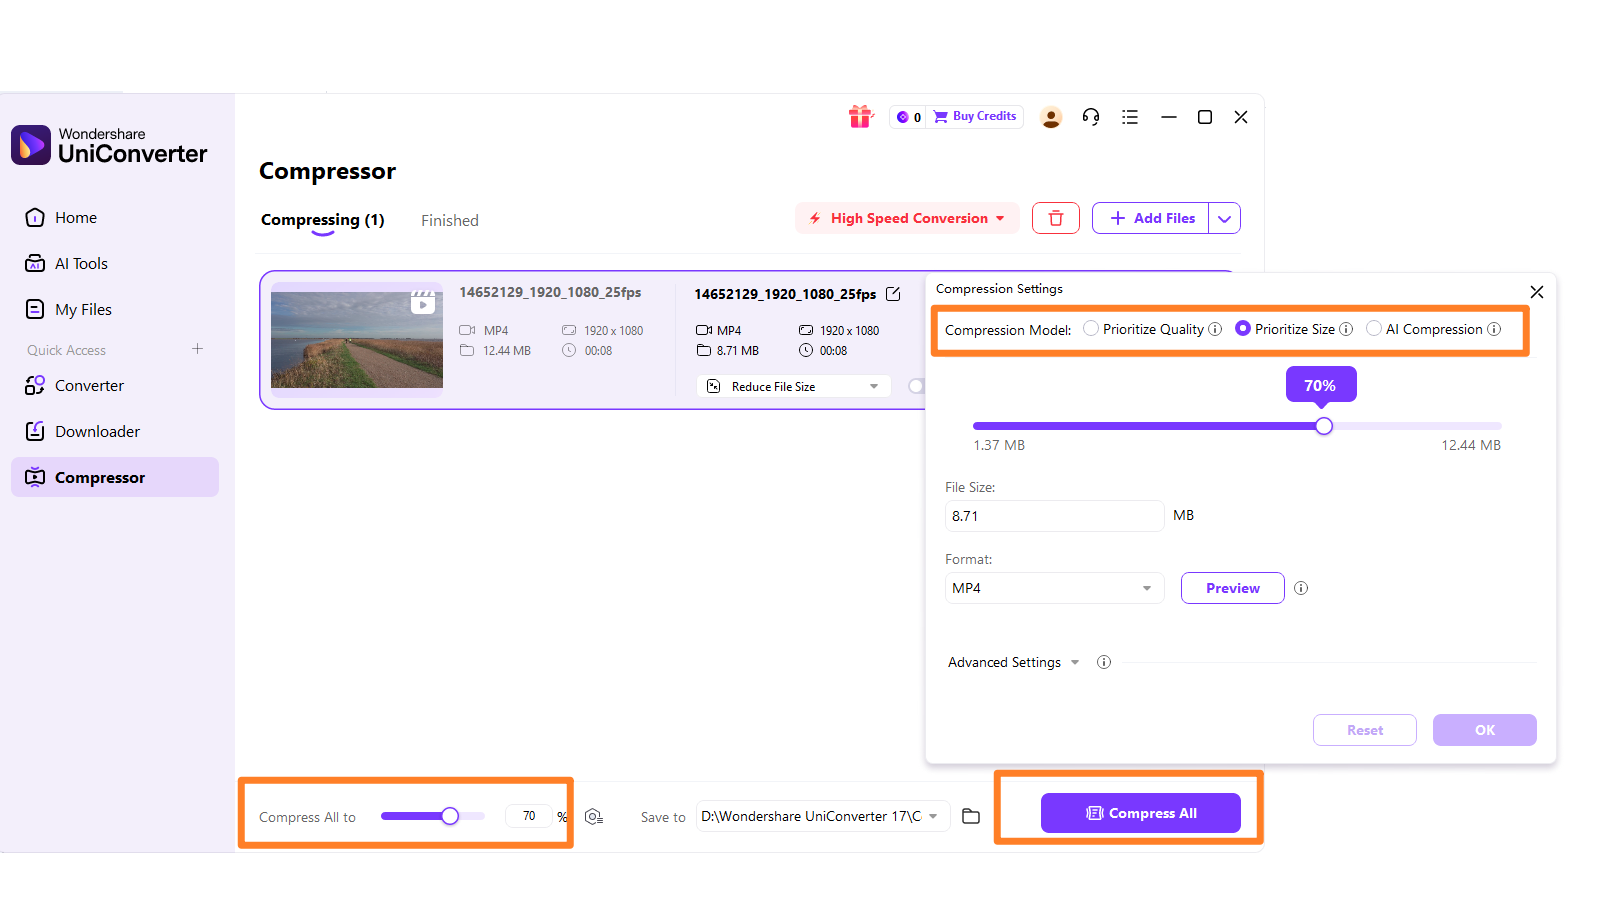
Step 3: Choose Required Parameters
Here, I can select my desired output format, adjust the quality slider, and set the resolution and bitrate to achieve the perfect balance between file size and quality.
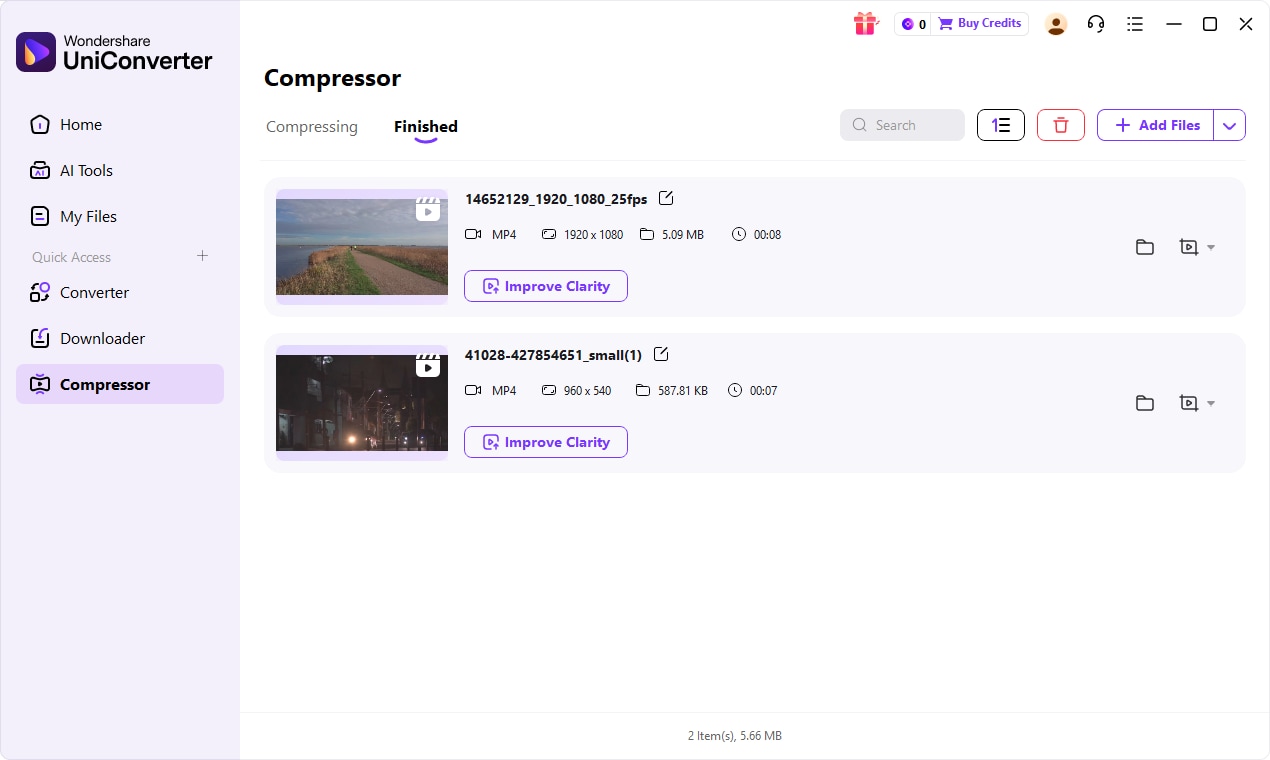
Step 4: Save the Compressed File
Once I'm satisfied with the settings, I click the "Compress" button. UniConverter quickly processes the files, and I can then save the compressed output to my chosen destination.

Camtasia Video Compressor Alternative for Better Results?
Part 7: Conclusion
After extensive use and comparison, my Camtasia Video Compressor review concludes that it remains a highly valuable tool for specific user groups. For educators, corporate trainers, and content creators who primarily produce screencasts and need an integrated solution for recording, editing, and basic compression, Camtasia is an excellent choice. Its ease of use and seamless workflow significantly streamline the content creation process. However, for budget-conscious users who only need occasional video compression and don't require the full editing suite, exploring free options like HandBrake would be more economical. Advanced users and professionals dealing with high-fidelity 4K footage or requiring granular control over codecs and advanced settings will find dedicated tools like Adobe Media Encoder or even HandBrake more suitable. For those seeking a balanced, user-friendly experience that offers more robust compression features than Camtasia's built-in tool, without the steep learning curve of professional software, UniConverter stands out as a top pick, providing a great blend of quality, efficiency, and ease of use.
Part 8: FAQs
-
1. Can Camtasia compress videos without losing quality?
Camtasia aims for a balance between file size and quality. While some quality loss is inherent in any compression process, Camtasia's default settings are generally good for its target audience, minimizing noticeable degradation. For truly lossless compression, you'd need specialized tools or methods that typically result in much larger file sizes.
-
2. Is Camtasia's video compressor suitable for YouTube uploads?
Yes, Camtasia's compressor is well-suited for YouTube uploads. It offers specific presets that optimize videos for online platforms like YouTube, ensuring good quality and efficient upload times. I've used it extensively for my YouTube content with great results.
-
3. How does Camtasia's compression compare to HandBrake?
Camtasia provides a more integrated, user-friendly experience, especially for screencasts, as it's part of an editing suite. HandBrake, on the other hand, offers significantly more granular control over compression settings and a wider range of advanced codecs, often resulting in smaller file sizes for the same perceived quality, but it comes with a steeper learning curve. If you need advanced control, HandBrake is superior.
-
4. Can I batch compress videos with Camtasia?
Camtasia has limited batch processing capabilities for compression. While you can queue multiple projects for export, it's not as robust as dedicated batch compressors. For extensive batch compression needs, I often turn to tools like UniConverter or HandBrake, which are far more efficient for processing multiple videos simultaneously.
-
5. What are the best settings for compressing videos in Camtasia?
The best settings depend on your specific needs, such as the target platform (e.g., YouTube, Vimeo), desired file size, and quality requirements. Generally, I recommend using the "Share" menu and selecting a preset like "Local File" with the recommended settings for your target platform. You can then fine-tune the output by adjusting the quality slider or bitrate, always making sure to preview the result.
