
- Camtasia Compressor: Integrated, user-friendly for basic audio leveling and noise reduction within Camtasia.
- Value Proposition: Ideal for educators and beginners needing quick, consistent audio for tutorials and presentations.
- Limitations: Lacks advanced controls, can introduce artifacts, and struggles with complex noise; not for professional audio work.
- Alternatives: Adobe Audition and DaVinci Resolve offer granular control; Audacity provides free basic functionality.
- Risks: Over-compression, inadequate noise reduction, and lack of real-time monitoring can degrade audio quality.
- UniConverter Solution: Offers efficient, stable, and lossless batch audio/video compression with advanced features beyond Camtasia.
In this article
- Part 1: What is Camtasia Audio Compressor?
- Part 2: Camtasia Audio Compressor: Core Features, Pros, and Cons
- Part 3: Camtasia Audio Compressor: Ideal Users and Scenarios
- Part 4: Camtasia Audio Compressor and Alternatives Comparison
- Part 5: Risks and Pitfalls to Avoid
- Part 6: How to Use UniConverter for Efficient Audio and Video Compression
- Part 7: Conclusion
- Part 8: FAQs
Camtasia Audio Compressor: A Comprehensive Review and Comparison
When I'm diving into video editing, especially for tutorials or online courses, audio quality is often an afterthought until I hit playback and realize my voice sounds inconsistent or drowned out by background noise. That's where an audio compressor comes in, aiming to balance sound levels and make everything clearer. Camtasia, a popular screen recording and video editing software, includes its own Camtasia Audio Compressor tool. This review will delve into its capabilities, compare it with other market offerings, and help you understand if it's the right fit for your audio enhancement needs. I'll explore its strengths, weaknesses, and ideal use cases, ensuring you make an informed decision about your audio workflow.
Part 1: What is Camtasia Audio Compressor?
The Camtasia Audio Compressor is an integrated feature within TechSmith's Camtasia video editing software, designed to help users achieve more consistent and professional-sounding audio in their video projects. Its primary function is to reduce the dynamic range of an audio track, making loud parts quieter and quiet parts louder, thereby creating a more balanced listening experience. This is particularly crucial for spoken-word content like tutorials, presentations, and online courses, where clarity and intelligibility are paramount.
The Role of Audio Compression in Video Production
* Ensuring Consistent Volume: Viewers shouldn't have to constantly adjust their volume controls. Compression helps maintain a steady audio level throughout your video.
* Improving Clarity: By bringing up quieter sounds, compression can make dialogue easier to understand, especially in environments with varying recording conditions.
* Enhancing Professionalism: Well-compressed audio sounds polished and professional, contributing significantly to the overall quality perception of your video content.
Part 2: Camtasia Audio Compressor: Core Features, Pros, and Cons
The Camtasia Audio Compressor offers a straightforward approach to audio leveling within the familiar Camtasia interface. Its core capability lies in its ability to automatically adjust audio levels, reduce background noise, and improve overall clarity with minimal user input. While it doesn't boast the granular control of dedicated audio workstations, it provides essential tools for common video production scenarios.
Pros:
* Integrated Workflow for Video Editing: Seamlessly built into Camtasia, eliminating the need to export audio to external software.
* User-Friendly Interface for Beginners: Simple sliders and presets make it easy for new users to achieve decent results without a steep learning curve.
* Effective for Basic Noise Reduction and Leveling: Can significantly improve the listenability of audio recorded in less-than-ideal environments.
Cons:
* Limited Advanced Compression Controls: Lacks detailed parameters like attack, release, ratio, and knee, which are crucial for professional audio engineers.
* Potential for Audio Artifacts with Aggressive Settings: Pushing the compression too far can introduce undesirable pumping or breathing sounds.
Part 3: Camtasia Audio Compressor: Ideal Users and Scenarios
The Camtasia Audio Compressor is tailored for a specific segment of content creators who prioritize efficiency and ease of use over highly specialized audio manipulation. If you're a video editor whose primary focus isn't audio engineering, but you still need your audio to sound good, this tool is designed for you.
Best Use Case: Quick Audio Enhancement for Educational Tutorials
I find Camtasia's compressor invaluable when I'm churning out educational content. For example, if I'm recording a software demonstration and my voice fluctuates slightly, or there's a subtle hum from my computer, the compressor quickly evens out the levels and reduces the noise. It’s perfect for ensuring my students don't miss a word due to inconsistent volume or minor distractions, allowing me to focus on the content itself rather than getting bogged down in complex audio settings.
Limitation Scenario: Professional Music Production or Podcast Mastering
However, I wouldn't dream of using Camtasia's compressor for professional music production or mastering a high-quality podcast. For these scenarios, where every nuance of sound matters, the limited controls of Camtasia simply aren't enough. I need precise adjustments for attack, release, ratio, and threshold to sculpt the sound exactly how I want it, preserving dynamics or creating specific sonic textures. Camtasia's "set it and forget it" approach falls short when I need that level of artistic control and audio fidelity.
Part 4: Camtasia Audio Compressor and Alternatives Comparison
When I'm looking at audio compression tools, I consider a few key aspects beyond just the basic function. It's about finding the right balance for my specific project needs. Here's how the Camtasia Audio Compressor stacks up against some popular alternatives.
| Feature/Software | Camtasia Audio Compressor | Adobe Audition | DaVinci Resolve Fairlight | Audacity |
| Ease of Use | High | Medium | Medium | High |
| Advanced Controls | Low | High | High | Medium |
| Integration | Camtasia | Adobe Suite | DaVinci Resolve | Standalone |
| Price | Included with Camtasia | Subscription | Free/Studio | Free |
| Target User | Educators, Beginners | Audio Professionals | Video Editors | Hobbyists |
Key Differentiators:
Camtasia excels in simplicity and integration within its own ecosystem. If you're already in Camtasia editing your video, its compressor is right there, making quick adjustments effortless. Professional tools like Adobe Audition and DaVinci Resolve's Fairlight module offer granular control and advanced algorithms, which are indispensable for intricate sound design or mastering. Free alternatives like Audacity provide basic functionality for budget-conscious users, offering more control than Camtasia but requiring a separate workflow. For instance, while Camtasia offers basic noise reduction, Audition's adaptive noise reduction is far more sophisticated, capable of removing complex background hums with greater precision.
Part 5: Risks and Pitfalls to Avoid
When I'm working with audio compression, especially with simpler tools, I've learned that there are several common traps that can actually degrade my audio rather than improve it. It's crucial to be aware of these risks to ensure my final product sounds professional.
Over-Compression Leading to Unnatural Sound
One of the biggest dangers I face is over-compressing my audio. If I push the compressor too hard, my audio can sound "squashed" or "pumped," losing all its natural dynamics. This makes voices sound unnatural and fatiguing to listen to, as the subtle variations in speech are flattened out. It’s like trying to fit a square peg in a round hole – the sound just doesn't breathe.
Inadequate Noise Reduction for Complex Audio Environments
While Camtasia offers some noise reduction, it's not a magic bullet. If I'm recording in a very noisy environment, relying solely on Camtasia's built-in tools often results in inadequate noise reduction. It might reduce some hum, but complex background chatter or strong environmental sounds will still be present, making my audio sound amateurish. For truly challenging audio, I need more sophisticated noise reduction algorithms found in dedicated audio software.
Lack of Real-time Monitoring for Precise Adjustments
A significant pitfall for me is the lack of robust real-time monitoring in some simpler tools. Without the ability to hear the compression effects instantly and precisely as I adjust parameters, it's difficult to make informed decisions. I might apply settings that sound good in isolation but don't blend well with the rest of my video, leading to a lot of trial and error and wasted time.
Compatibility Issues with External Audio Plugins
If I'm used to working with specific third-party audio plugins for advanced effects or specialized compression, I often run into compatibility issues with basic video editors. These tools are usually closed ecosystems, meaning I can't easily integrate my preferred VSTs or AU plugins. This forces me to either compromise on quality or resort to a more complex workflow involving exporting and re-importing audio, which defeats the purpose of an integrated solution.
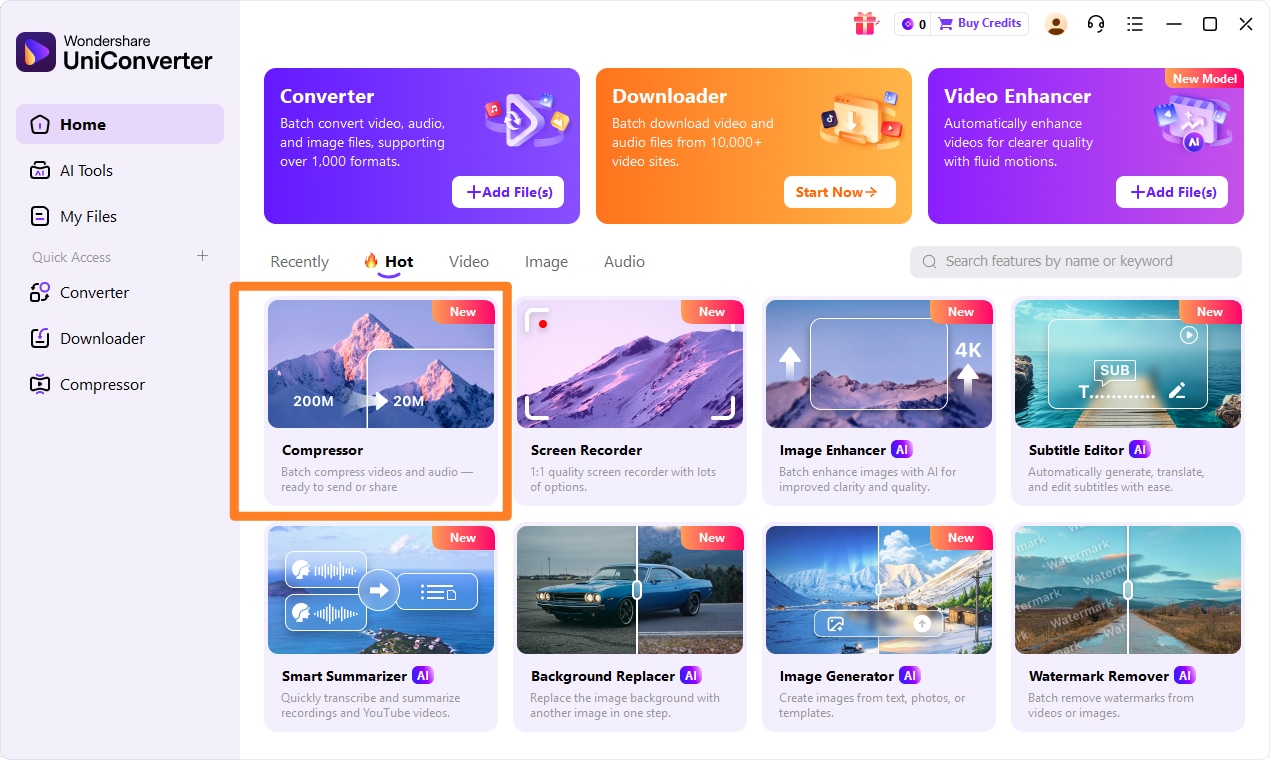
Part 6: How to Use UniConverter for Efficient Audio and Video Compression
Sometimes, I find that while some tools offer basic compression, they may still lack batch processing, stable results, or reliable quality control. In such cases, I turn to UniConverter as a practical solution for both audio compression and video handling. It works as an all-in-one toolkit for different media tasks, supports a wide range of formats, and is also useful for users looking for a dependable video compressor for PC. For me, it remains a convenient choice for managing media files more efficiently.
Step 1: Open UniConverter and Choose Compressor
First, I launch UniConverter on my computer. On the main interface, I navigate to the "Compressor" tab. This is where I'll start the process of optimizing my audio or video files.
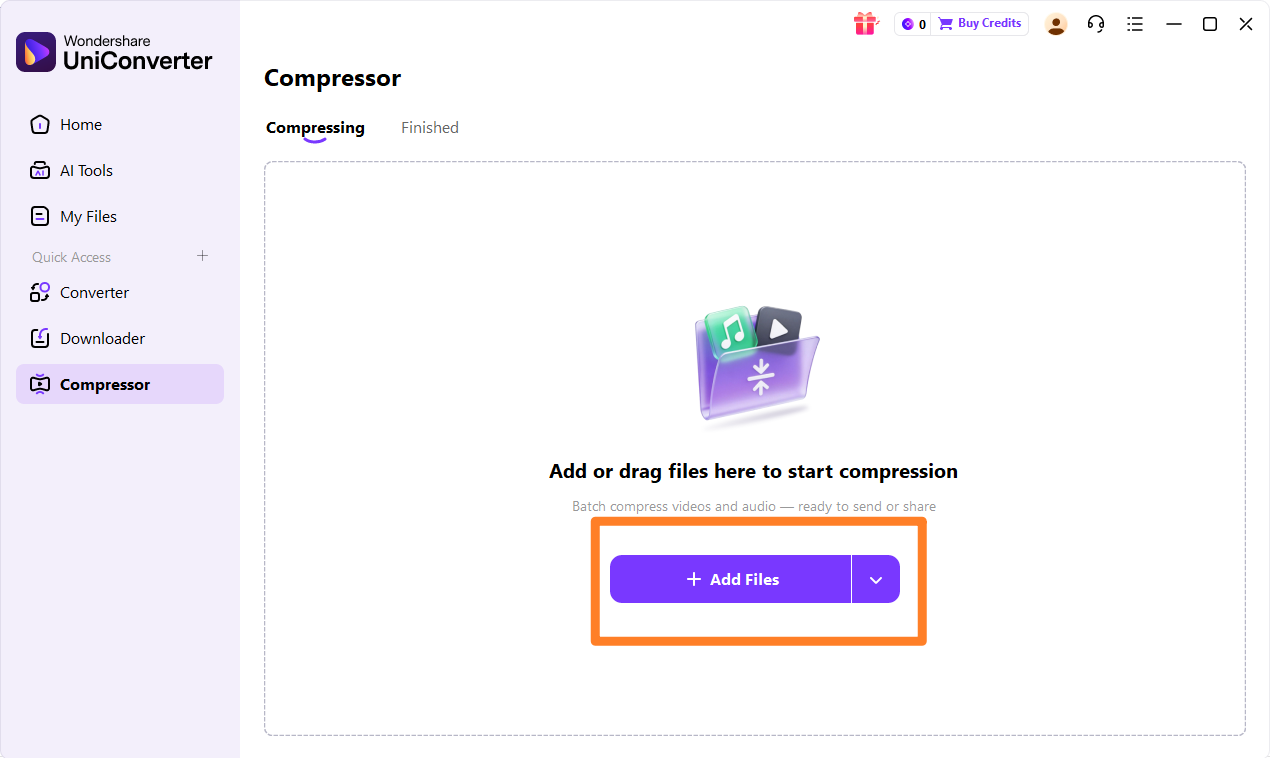
Step 2: Upload the Video, Audios or Images
Next, I click on the "Add Files" button or simply drag and drop the video, audio, or even image files I want to compress into the UniConverter window. I can add multiple files for batch processing.
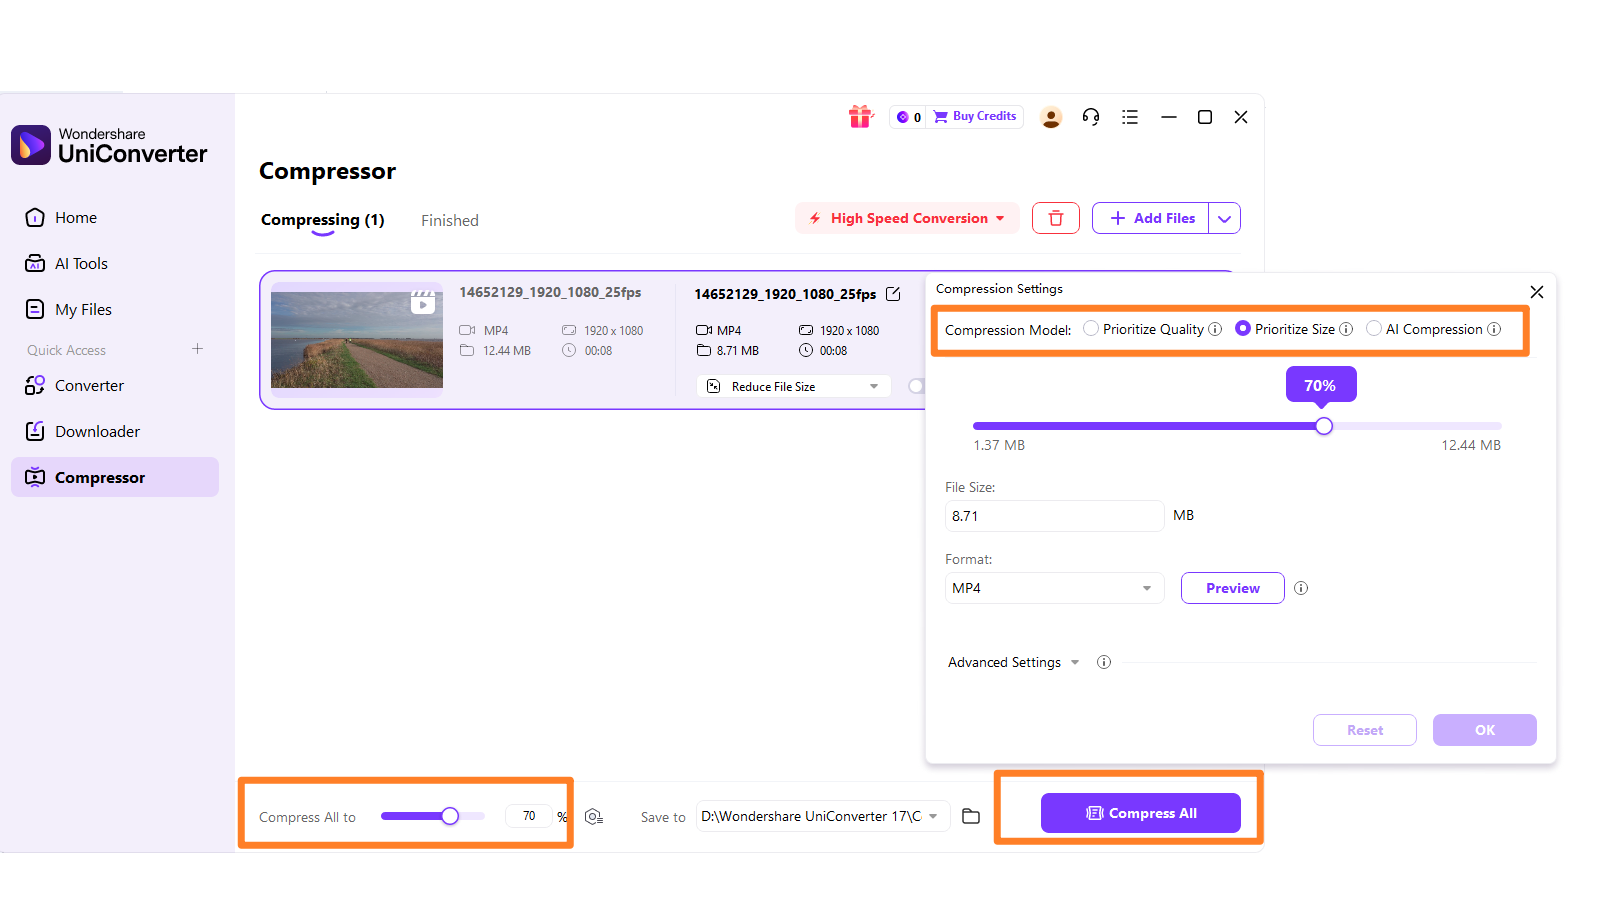
Step 3: Choose Required Parameters
Once my files are loaded, I can select each file and adjust the compression settings. UniConverter allows me to choose the output format, resolution, bitrate, and quality. I can also use the smart compression feature to automatically optimize the file size.
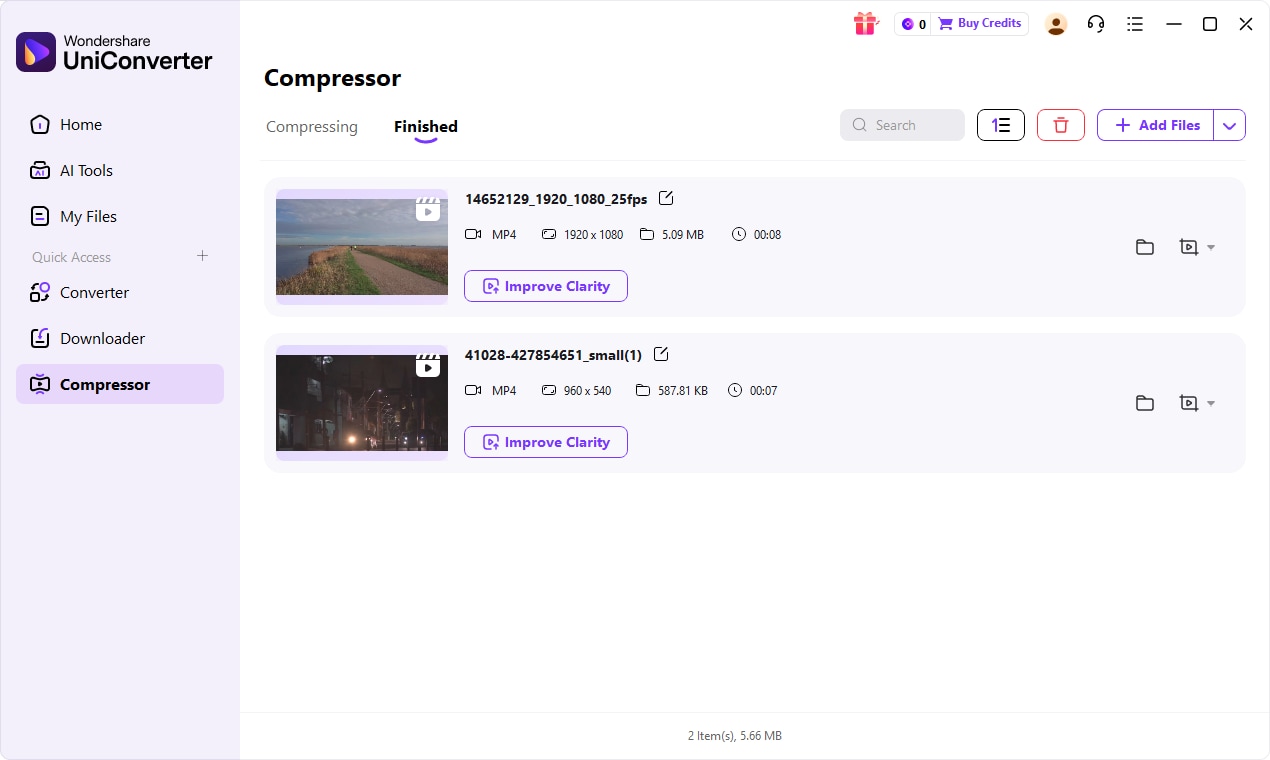
Step 4: Save the Compressed File
After setting all the parameters, I click the "Compress" button. UniConverter will then process the files. Once completed, I can find my optimized files in the designated output folder, ready for use.

Enhance Audio Quality Beyond Camtasia Compressor
Part 7: Conclusion
After exploring the capabilities of the Camtasia Audio Compressor and comparing it with various alternatives, it's clear that its value largely depends on your specific needs and technical proficiency. For casual users, educators, and content creators who primarily work within the Camtasia ecosystem and require quick, straightforward audio enhancements for tutorials or presentations, Camtasia remains a highly viable and convenient option. Its ease of use and integrated workflow are undeniable advantages. However, for aspiring audio engineers, professional podcasters, or anyone requiring granular control over their sound, dedicated audio software like Adobe Audition or DaVinci Resolve's Fairlight module offers the precision and advanced features necessary for high-fidelity results. For those seeking an all-in-one video editor with more robust integrated audio tools, exploring solutions that bridge the gap between basic and professional audio editing would be beneficial. Ultimately, the best tool is the one that fits seamlessly into your workflow and helps you achieve your desired audio quality without unnecessary complexity or compromise.
Part 8: FAQs
-
1. What is the primary purpose of an audio compressor?
An audio compressor reduces the dynamic range of an audio signal, making loud parts quieter and quiet parts louder, resulting in a more consistent volume. This helps to prevent clipping on loud peaks and makes quieter sections more audible, improving the overall listening experience.
-
2. Can Camtasia Audio Compressor remove all background noise?
While Camtasia can reduce some background noise, it's not designed for advanced noise removal. For complex noise issues, such as persistent hums, static, or environmental sounds, dedicated audio clean-up tools found in software like Adobe Audition or even UniConverter's advanced features are more effective at isolating and eliminating unwanted sounds without degrading the primary audio.
-
3. Is UniConverter a free alternative to Camtasia for audio compression?
UniConverter offers a free trial with limited features, but its full functionality, including advanced compression options and batch processing, requires a paid license. While not entirely free, its comprehensive toolkit often provides better value and more robust features for audio and video compression compared to basic free tools.
-
4. How does over-compression affect audio quality?
Over-compression can lead to a "squashed" or "pumping" sound, where the audio loses its natural dynamics and can sound unnatural or fatiguing to listen to. It can also introduce undesirable artifacts, making the audio sound less professional and potentially irritating to the listener.
-
5. What are some key parameters to adjust when using an audio compressor?
Key parameters include Threshold (the level at which compression begins), Ratio (how much compression is applied to signals above the threshold), Attack (how quickly the compressor reacts to a signal exceeding the threshold), and Release (how quickly the compressor returns to its uncompressed state after the signal falls below the threshold). Understanding and adjusting these parameters allows for precise control over the audio's dynamics.
