
In this article
Part 1. What is RAW? What is WebP?
What Is RAW?
RAW is an unprocessed image format created by digital cameras. Instead of applying heavy in-camera compression or finalizing the image for easy sharing, a RAW file stores a large amount of original sensor data. This gives photographers much more room to adjust exposure, white balance, highlights, shadows, and color during editing.
That editing flexibility is the main reason RAW is widely used in professional photography. Wedding photographers, portrait retouchers, landscape artists, and commercial shooters often prefer RAW because it gives them more control over the final image. If a photo is slightly underexposed or the color temperature is off, a RAW file usually offers a better chance of correcting it without harming image quality too much.
The trade-off is that RAW files are large, not always universally supported across simple apps or browsers, and not ideal for direct online publishing.
What Is WebP?
WebP is a web-focused image format developed to reduce file size while maintaining good visual quality. It supports efficient compression, which makes it a strong choice for websites, blogs, online stores, landing pages, and digital publishing.
Compared with heavier image formats, WebP helps pages load faster. That matters for user experience, SEO performance, and Core Web Vitals in 2026, especially on mobile devices and slower connections. WebP can also support transparency, which is useful for UI elements, logos, and layered web graphics.
In short, WebP is built for distribution rather than deep post-processing. It is meant to deliver images efficiently online, not to preserve every bit of original camera data for editing.
RAW vs WebP at a Glance
The fastest way to understand RAW vs WebP is this:
- RAW is built for capture and editing.
- WebP is built for sharing and web performance.
That is why many users get confused when comparing them directly. They are both image formats, but they are not trying to solve the same problem. If your priority is editing freedom, RAW is usually the better choice. If your priority is lightweight online delivery, WebP usually wins.
Part 2. Quick Comparison Table
RAW vs WebP Comparison Table
| Feature | RAW | WebP |
| Purpose | Capture and preserve maximum image data | Deliver optimized images online |
| Image data retention | Very high | Reduced compared with RAW |
| File size | Large | Small to medium |
| Editing flexibility | Excellent | Limited |
| Compression | Minimal or none in the final-use sense | Efficient lossy or lossless compression |
| Transparency support | Typically not a practical distribution feature | Yes |
| Web compatibility | Poor for direct browser delivery | Strong for modern web use |
| Best for | Photography, retouching, archiving | Websites, blogs, e-commerce, sharing |
| Storage efficiency | Low | High |
| Workflow stage | Early and mid-stage editing workflow | Final publishing and distribution stage |
Key Takeaways from the Table
The table shows a very clear pattern. RAW is better when your goal is to preserve quality and maintain editing latitude. WebP is better when your goal is to reduce image weight and publish online efficiently.
So the better format depends less on abstract quality debates and more on where you are in the workflow. If you are still editing, RAW is usually the smarter option. If you are ready to publish, WebP is often the more practical choice.
Part 3. RAW vs WebP: Which One Is Better?
When RAW Is Better
RAW is better for professional and quality-sensitive image work. If you need strong control over color correction, exposure recovery, highlight detail, shadow detail, and retouching, RAW gives you the widest editing range.
It is especially useful for:
- Professional photography sessions
- Studio portraits
- Wedding photography
- Product shoots for later retouching
- Landscape photography with complex lighting
- Fine-art editing and archival storage
In these situations, the large file size is often worth it because the goal is not speed—it is quality and control.
When WebP Is Better
WebP is better when the image is meant for online viewing rather than intensive editing. If you manage a blog, e-commerce store, portfolio site, or marketing page, lighter image files can make a meaningful difference in loading speed and user experience.
WebP works especially well for:
- Blog featured images
- Website banners
- Product listing images
- Landing pages
- Online galleries
- Social sharing workflows that begin with web-optimized assets
For web teams and SEO practitioners, WebP is often the practical choice because it helps reduce page weight without severely harming perceived image quality.
Is RAW Better Than WebP for Quality?
Yes, RAW is better than WebP for pure image data retention and editing quality. RAW contains much more original information from the camera sensor, which is why it performs better in post-processing.
However, that does not automatically make RAW the better format for every use case. A RAW file may be superior in data richness, but it is not efficient for web delivery. WebP is optimized for a different purpose: making images easier to load, store, and share online.
So if "quality" means maximum editing potential, RAW wins. If "quality" means a good-looking image delivered quickly on a website, WebP may be the better practical answer.
Is WebP Better Than RAW for Websites?
Yes, in most website publishing scenarios, WebP is the better choice. Smaller files generally help pages load faster, and faster pages tend to create a better user experience. This matters for blogs, online stores, media sites, and brand pages in 2026.
For example, an e-commerce manager may have high-resolution product photos from a photographer. Keeping those originals in RAW makes sense for future editing, but publishing them as RAW on a product page does not. Converting them to WebP is usually a more sensible way to maintain visual clarity while improving page performance.
Final Verdict by User Need
Here is the simplest way to decide:
- Choose RAW for capture, editing, retouching, and long-term image work.
- Choose WebP for publishing, distribution, and web performance.
For many users, the best solution is not one format over the other, but both in sequence. Shoot and edit in RAW, then convert or export to WebP when the image is ready for online use.
If you need an efficient way to handle that publishing-stage conversion, Wondershare UniConverter is a strong choice. It is especially useful for users who work with many files at once and want a straightforward workflow instead of a technical setup.
Part 4. Use Cases for RAW and WebP
Best Use Cases for RAW
RAW is the right choice when image quality and editing headroom matter most. Common examples include:
- Wedding and portrait photography, where skin tones and lighting need careful refinement
- Commercial photography, where product accuracy and retouching quality affect brand presentation
- Landscape and fine-art editing, where preserving tonal range can be crucial
- Archiving source images before final export, so you always keep a high-quality original
A photographer may deliver final web previews to clients in a lighter format, but they usually keep RAW files as the master source.
Best Use Cases for WebP
WebP is ideal for final-use web assets. It is especially effective when balancing visual quality with speed and storage efficiency.
Common use cases include:
- Website banners and hero images
- Product pages and online stores
- Blog featured images
- Portfolio previews and online galleries
For marketers and site owners, WebP helps keep pages responsive while still presenting professional-looking images. This can be particularly important on mobile-first websites where every megabyte affects performance.
Who Should Use Both Formats in One Workflow?
Many users benefit from using both formats instead of choosing only one.
This includes:
- Photographers who edit in RAW and publish in WebP
- Marketers who need source-quality originals and lightweight website assets
- E-commerce teams that want polished product images without slowing page speed
- Content creators who maintain high-quality archives while posting optimized web versions
A real-world example: a fashion photographer may shoot in RAW, retouch the collection images for color consistency, then convert selected files to WebP for the brand's online catalog. That keeps the editing workflow strong while making the store faster for shoppers.
Recommended Workflow
A practical workflow looks like this:
- Capture and edit in RAW.
- Keep the RAW files as your master originals.
- Export or convert to WebP for final online use.
At this stage, Wondershare UniConverter fits naturally into the publishing workflow. It is useful when you need fast batch conversion for many images, such as product catalogs, article image libraries, or campaign assets. It also supports image and video enhancement, which can be helpful for creators handling mixed media projects. For example, a small business team may improve product visuals before publishing, then choose custom image clarity settings for web images or adjust audio parameters separately for promotional video assets in the same software environment. That kind of flexibility can save time when content creation involves more than just a single image file.
Part 5. Step-by-Step Guide to Convert RAW to WebP Using UniConverter
Why Use UniConverter for This Task
Wondershare UniConverter is a good fit for this task because it keeps the conversion process simple for beginners while still offering useful control for more advanced users. If you need to process multiple images at once, its efficient batch conversion can save a lot of time. This is especially practical for photographers exporting client previews, bloggers preparing article visuals, or e-commerce teams optimizing a full set of product images.
Another advantage is flexibility. UniConverter lets users choose custom output quality for video or image files, which is helpful when you want a better balance between visual clarity and file size. It also includes enhancement tools for video and images, so creators working on broader campaigns can improve media quality in one workflow. And for users handling multimedia projects, flexible audio parameter settings can help standardize sound output alongside visual assets.
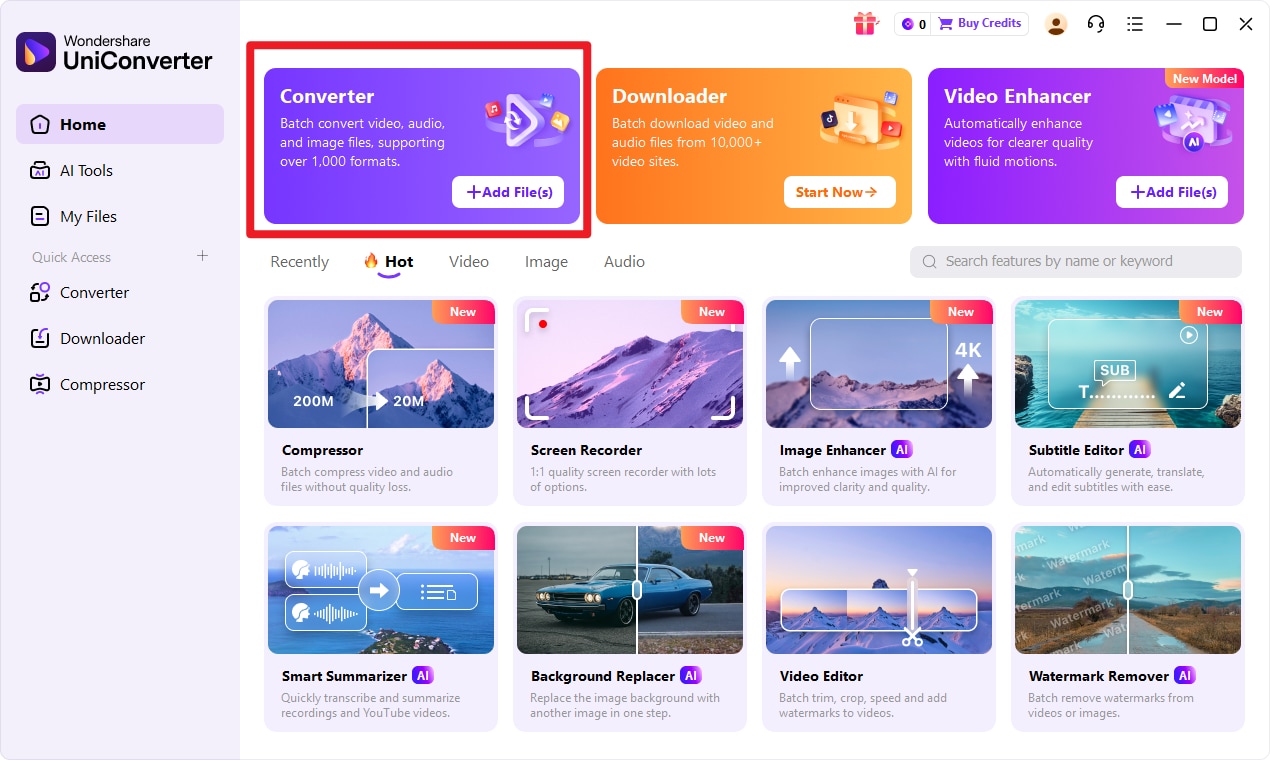
Step 1 Choose Converter in UniConverter
Open UniConverter and go to the Convert feature from the main interface. This is the workspace where you can prepare to change input format into target format. If you regularly manage image assets for websites, this central layout makes the process easier to repeat across multiple projects.
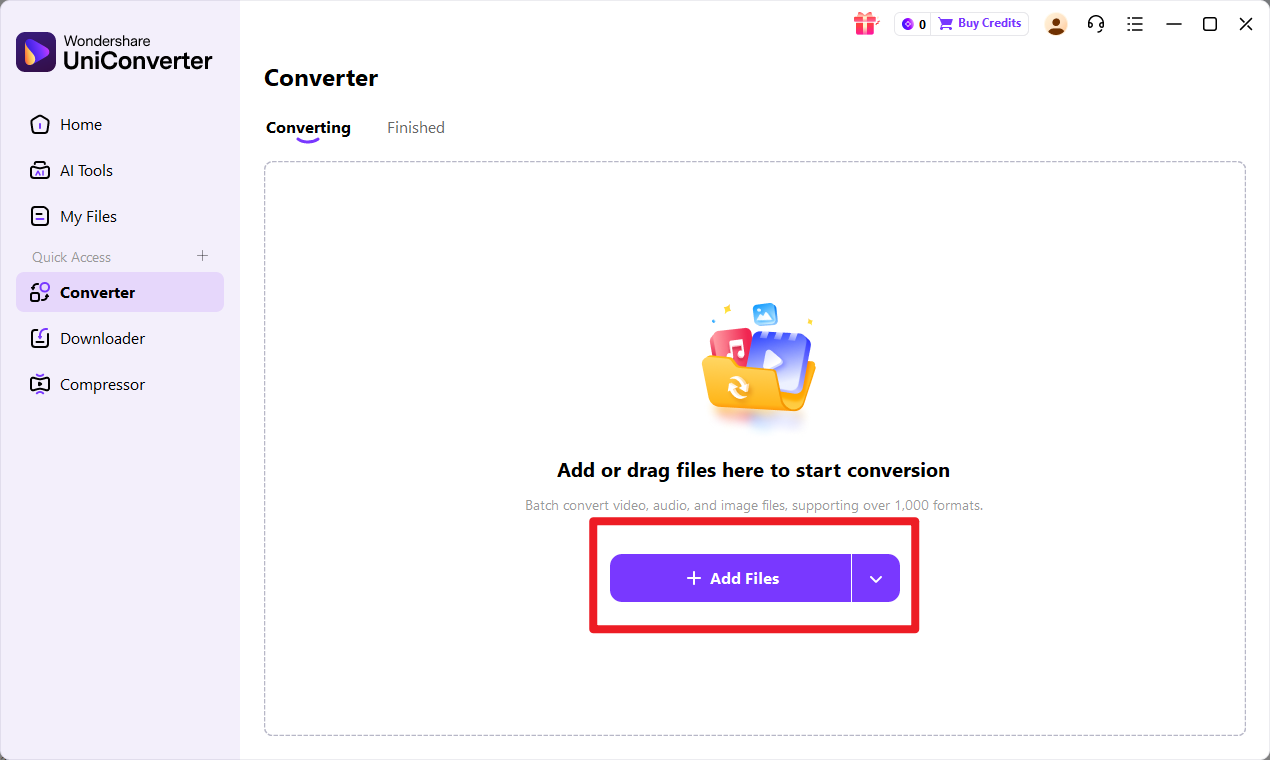
Step 2 Add Files to UniConverter
Import your input format files into UniConverter. You can add a single file or multiple files depending on your workflow. Batch importing is especially useful if you are preparing many portfolio images, blog visuals, or product photos at once. Before moving on, confirm that the files have loaded correctly.
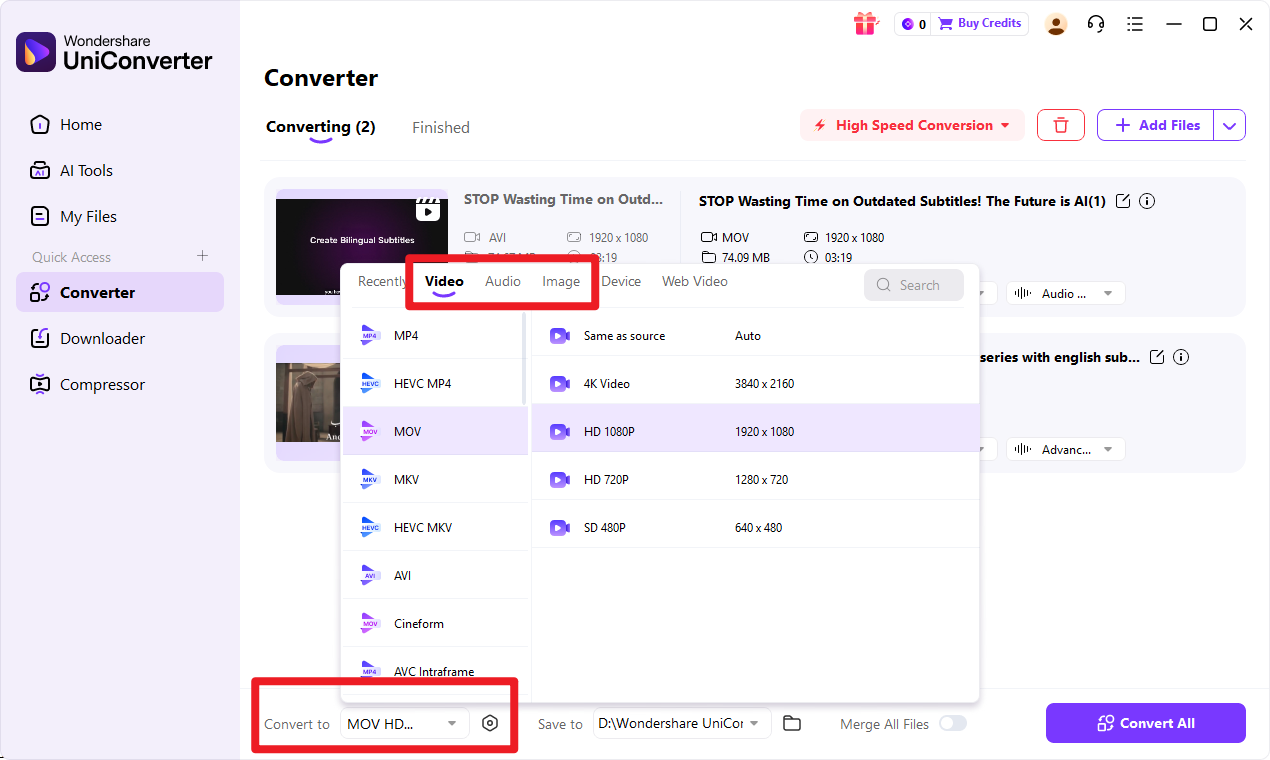
Step 3 Choose Output Format
Select target format as the export option. Then adjust quality or related output settings if needed. This step matters because different publishing goals require different balances between image clarity and file size. For example, a homepage banner may need higher quality than a small blog thumbnail. You can also confirm the save location before converting.
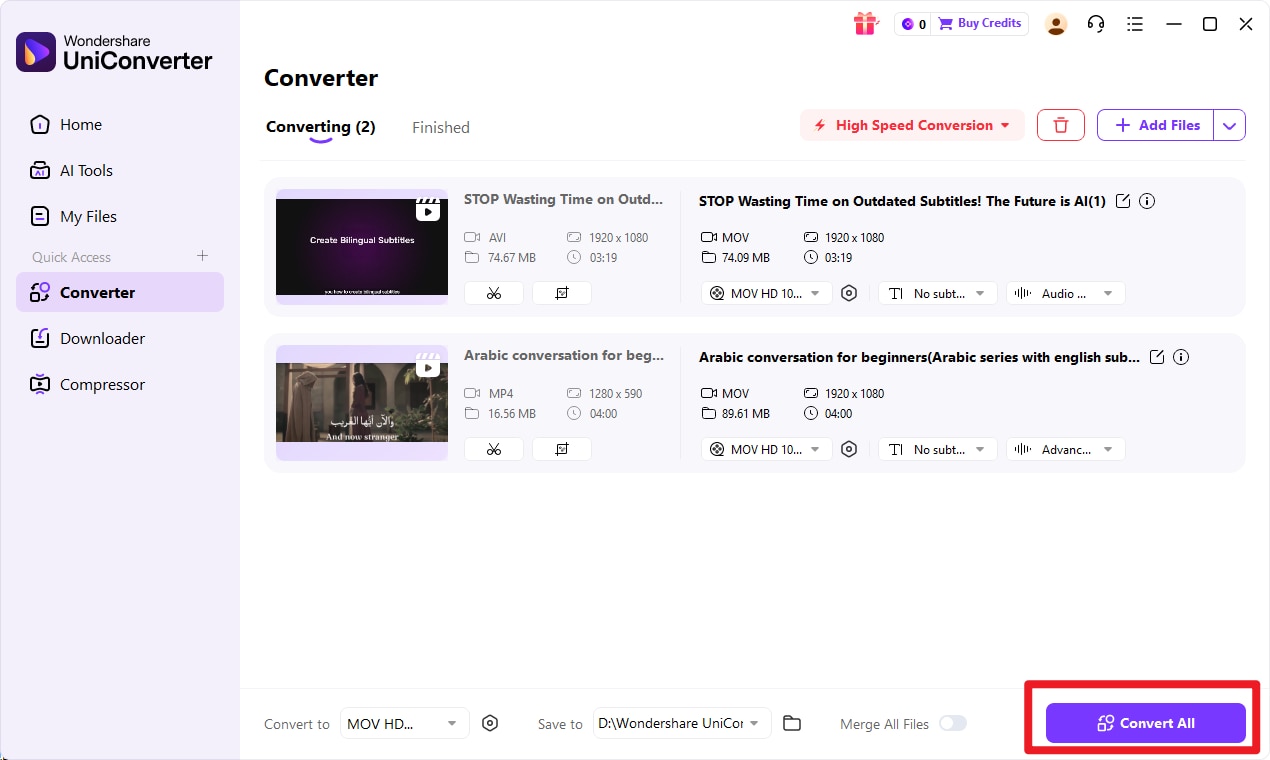
Step 4 Start the Conversion
Click Convert or Start to begin processing. Wait for UniConverter to finish the task, then open the converted target format files and review the results for web use. If needed, compare file size and appearance before uploading them to your site, CMS, or online store.
Simplify RAW to WebP Image Conversion
Conclusion
RAW vs WebP comes down to workflow purpose: RAW is best for image capture and editing, while WebP is best for lightweight online delivery.
If quality, retouching control, and long-term image preservation come first, use RAW. If page speed, storage efficiency, and web publishing matter more, use WebP. For many users, the smartest approach is to use both—RAW for the source, WebP for the final online version.
If you already have images in input format and need web-ready files quickly, Wondershare UniConverter is a practical next step. Its batch conversion, enhancement features, and flexible quality controls make it useful for creators, marketers, photographers, and site managers who want a smoother publishing workflow.
FAQs
-
1. Is RAW better than WebP?
RAW is better for editing and preserving original image data. WebP is better for web performance, sharing, and smaller file sizes. Each format is better in a different context. -
2. Can WebP replace RAW?
Not fully. RAW and WebP serve different purposes in the image workflow. RAW is for capture and post-processing, while WebP is for optimized delivery and publishing. -
3. Which format is better for photographers?
RAW is usually better during shooting and editing because it preserves more image information. WebP becomes useful later when photographers need to publish previews, galleries, or portfolio images online. -
4. Which format is better for websites?
WebP is generally the better choice for websites because it creates smaller files that can help improve load speed and overall user experience. -
5. Can I convert RAW to WebP easily?
Yes. Wondershare UniConverter offers a simple workflow for turning input format into target format, including support for batch conversion when you need to prepare multiple files at once. -
6. Does converting RAW to WebP reduce quality?
Yes, some image data and editing flexibility are reduced because the two formats are designed for different purposes. That said, WebP can still deliver strong visual quality for websites and online publishing when the output settings are chosen carefully.