
Choosing the right video format is one of the most critical decisions a filmmaker or video creator can make. It impacts everything from image quality and post-production flexibility to storage costs and editing speed. Two of the most talked-about options in the professional sphere are Apple ProRes and Camera RAW. The debate over ProRes vs RAW can be confusing, as they represent fundamentally different approaches to capturing and storing video data. Are you sacrificing quality for convenience with ProRes? Is RAW overkill for your project?
This guide is designed to demystify these two powerful formats. We will break down their technical differences, compare their strengths and weaknesses, and provide practical advice on when to use each one. By understanding the core distinctions in image quality, file size, and workflow, you can make an informed decision that sets your project up for success from the moment you press record.
In this article
Part 1. What is Apple ProRes? What is Camera RAW?
Before we can compare them, it's essential to understand what ProRes and RAW are individually. They are not direct competitors in the same category; one is a ready-to-use video codec, while the other is a collection of raw sensor data.
What is Apple ProRes?
Apple ProRes is a family of high-quality, lossy video compression formats (codecs) developed by Apple Inc. Its primary purpose is to provide a "best of both worlds" solution for post-production. It compresses video files to make them more manageable than uncompressed video, but it does so in a way that retains a very high level of image quality, often described as "visually lossless."
The key benefit of ProRes is its optimization for editing. It's an intra-frame codec, meaning each frame is compressed individually. This makes it less computationally demanding for a computer to decode, resulting in smooth, real-time playback and scrubbing in editing software like Final Cut Pro, Adobe Premiere Pro, and DaVinci Resolve.
ProRes comes in several different versions, each offering a different balance of data rate and quality:
- ProRes 422: A standard for professional video, offering excellent quality at a reduced file size.
- ProRes 422 HQ (High Quality): Offers higher data rates and even better quality, suitable for high-end mastering.
- ProRes 4444 & 4444 XQ: These top-tier versions support alpha channels (for transparency) and the highest possible quality, making them ideal for color-critical work and visual effects compositing.
What is Camera RAW?
Camera RAW is not a single, standardized format like ProRes. Instead, "RAW" is a general term for the minimally processed data captured directly from a camera's image sensor. Think of it as a "digital negative." When you shoot in a format like JPEG or a standard video codec, the camera processes the sensor data, making decisions about white balance, sharpening, color saturation, and contrast, and then "bakes" those settings into the final file.
RAW video, on the other hand, bypasses most of this in-camera processing. It captures the raw, unaltered information from the sensor, along with a set of metadata instructions on how the image should look. This provides an unparalleled level of flexibility in post-production.
Different camera manufacturers have their own proprietary RAW formats, including:
- Blackmagic RAW (BRAW)
- REDCODE RAW (R3D)
- ArriRAW (ARI)
- Canon Cinema RAW Light (CRM)
- Sony RAW
The primary benefit of RAW is creative control. Since parameters like ISO, white balance, and color space are not permanently embedded, you can adjust them non-destructively in your editing or color grading software, giving you the maximum ability to craft the final look of your image.
Part 2. Quick Comparison Table
To get a clear, at-a-glance overview, here is a quick comparison table outlining the key differences between ProRes and RAW.
| Feature | Apple ProRes | Camera RAW |
| Image Flexibility | Good. Settings like white balance and ISO are "baked in." | Maximum. Full control over sensor data in post-production. |
| File Size | Large, but significantly smaller than RAW. | Extremely large. |
| Editing Performance | Excellent. Designed for smooth, real-time playback. | Demanding. Requires a powerful computer or the use of proxies. |
| Storage Requirements | High. Requires fast drives and significant capacity. | Very High. Demands robust, high-capacity storage solutions. |
| Workflow | Simple and direct. Files are ready to edit immediately. | More complex. Often requires a debayering and grading step. |
Part 3. ProRes vs RAW: Which One Is Better?
The question of "which is better" depends entirely on your project's priorities. Let's dive deeper into the key areas of comparison: image quality, file management, and post-production workflow.
Comparison of Image Quality and Color Flexibility
This is the heart of the RAW advantage. Because RAW files contain the complete data from the camera's sensor before any major processing or compression, they offer the highest possible level of image quality. This translates to maximum latitude in post-production. You can recover seemingly lost details in highlights and shadows, make dramatic changes to color temperature and tint, and push and pull the image in a color grade without it falling apart. This is why RAW is the standard for cinema and high-end commercial work where precise control over the final image is paramount.
ProRes, while technically a "lossy" codec, delivers excellent, visually lossless quality that is more than sufficient for the vast majority of professional applications, including broadcast television, documentaries, and high-end corporate video. However, because key image parameters like white balance, ISO, and the color profile are committed ("baked in") during recording, your flexibility to alter them in post is more limited compared to RAW. You can still perform extensive color correction, but you are starting from a point that has already been processed by the camera.
Comparison of File Size and Storage Management
Here, the tables turn in favor of ProRes. RAW files are enormous. They capture a massive amount of data for every single frame, which quickly adds up to terabytes of storage for even moderately sized projects. This has significant implications for your budget and workflow. You'll need more hard drives, they'll need to be faster (SSDs are often required), and the time it takes to transfer footage from camera cards to your workstation will be much longer.
ProRes files are compressed, striking a much more practical balance between quality and file size. While still large compared to consumer formats like H.264, they are significantly smaller than their RAW counterparts. For example, a minute of 4K footage in ProRes 422 HQ might take up around 5-6 GB, whereas the same minute in a high-quality RAW format could easily be 20-30 GB or more. This makes storage planning, data backup, and overall media management far easier and more cost-effective with ProRes.
Comparison of Editing and Post-Production Workflow
ProRes was built from the ground up for post-production. It is an "edit-ready" or "intermediate" codec. This means that editing software can decode and play it back with minimal processing power. The result is a smooth, responsive editing experience, even on moderately powerful computers. You can drop ProRes files onto your timeline and start cutting immediately without lag, stuttering, or the need for pre-rendering.
RAW footage, on the other hand, is computationally intensive. Before your computer can even display a RAW image, it must perform a process called "debayering," which interprets the raw sensor data into a viewable color image. Doing this in real-time for a 4K or 8K video stream at 24+ frames per second requires immense processing power from both the CPU and GPU. Editing native RAW files can bring even high-end workstations to a crawl.
To overcome this, a common professional workflow is to create "proxy" files. This involves converting the large RAW files into smaller, edit-friendly files—very often in a ProRes format. Editors then use these lightweight proxies for the entire creative edit. Once the edit is complete, the system links back to the original high-quality RAW files for the final color grading and export. If you need to create proxies, a reliable tool like Wondershare UniConverter can streamline this conversion process, batch-processing your RAW files into edit-ready ProRes quickly and efficiently.
Part 4. Use Cases for ProRes and RAW
Understanding the technical differences is one thing; knowing when to apply them in the real world is another. Here are some practical scenarios for choosing each format.
When to Use ProRes
ProRes is the ideal choice when efficiency, speed, and reliability are top priorities without compromising on professional quality.
- Fast-Turnaround Projects: For broadcast news, event coverage, and some documentaries, deadlines are tight. ProRes allows you to go from shooting to editing almost instantly, eliminating time-consuming transcoding steps.
- Corporate and Web Content: Most corporate videos and online content need to look professional but don't require the extreme grading flexibility of RAW. ProRes delivers a polished look with a manageable workflow.
- Editing on Limited Hardware: If you're editing on a laptop or an older desktop, ProRes will provide a much smoother and more pleasant experience than trying to wrestle with native RAW files.
- As a Proxy or Intermediate Format: Even on high-end RAW projects, ProRes is indispensable. It's the industry-standard format for creating proxy files for editing and is often the format that visual effects artists request to work with.
When to Use RAW
Shooting in RAW is a deliberate choice for projects where creative control and maximum image fidelity are non-negotiable.
- High-End Productions: Feature films, scripted television series, and major commercials almost exclusively shoot in RAW. This gives the director and colorist the ultimate control to craft a specific, nuanced look for the story.
- Extensive Visual Effects (VFX) Work: VFX artists need as much data as possible to seamlessly integrate computer-generated elements with live-action footage. The clean, unadulterated data in a RAW file is perfect for keying (green screen), tracking, and compositing.
- Maximum Grading Flexibility is Required: If you are aiming for a highly stylized look or need to make significant corrections, RAW is the only way to go. It allows you to push and pull the image to its limits without introducing artifacts.
- Challenging Lighting Conditions: In situations with very high contrast (bright skies and deep shadows) or mixed color temperatures, RAW's wide dynamic range and data depth give you the best chance of creating a balanced, clean image in post.
Part 5. Step-by-Step Guide to Convert RAW to ProRes Using UniConverter
For many filmmakers, the ideal workflow involves shooting in RAW and editing with ProRes proxies. This gives you the best of both worlds: maximum quality for the final product and a smooth, efficient editing process.
Why Convert RAW to ProRes?
Converting RAW footage to ProRes is a standard industry practice to create "proxy" files. These smaller, less computationally demanding files allow for smooth, real-time editing on most systems without the lag and stutter associated with native RAW playback. This process doesn't discard your original RAW files; it simply creates an edit-friendly copy. Wondershare UniConverter is a powerful and user-friendly tool that simplifies this essential conversion process, supporting various RAW formats and leveraging hardware acceleration for speed.
How to Convert RAW to ProRes in 4 Steps
Here's how you can quickly batch-convert your RAW files to ProRes for a smoother editing workflow.
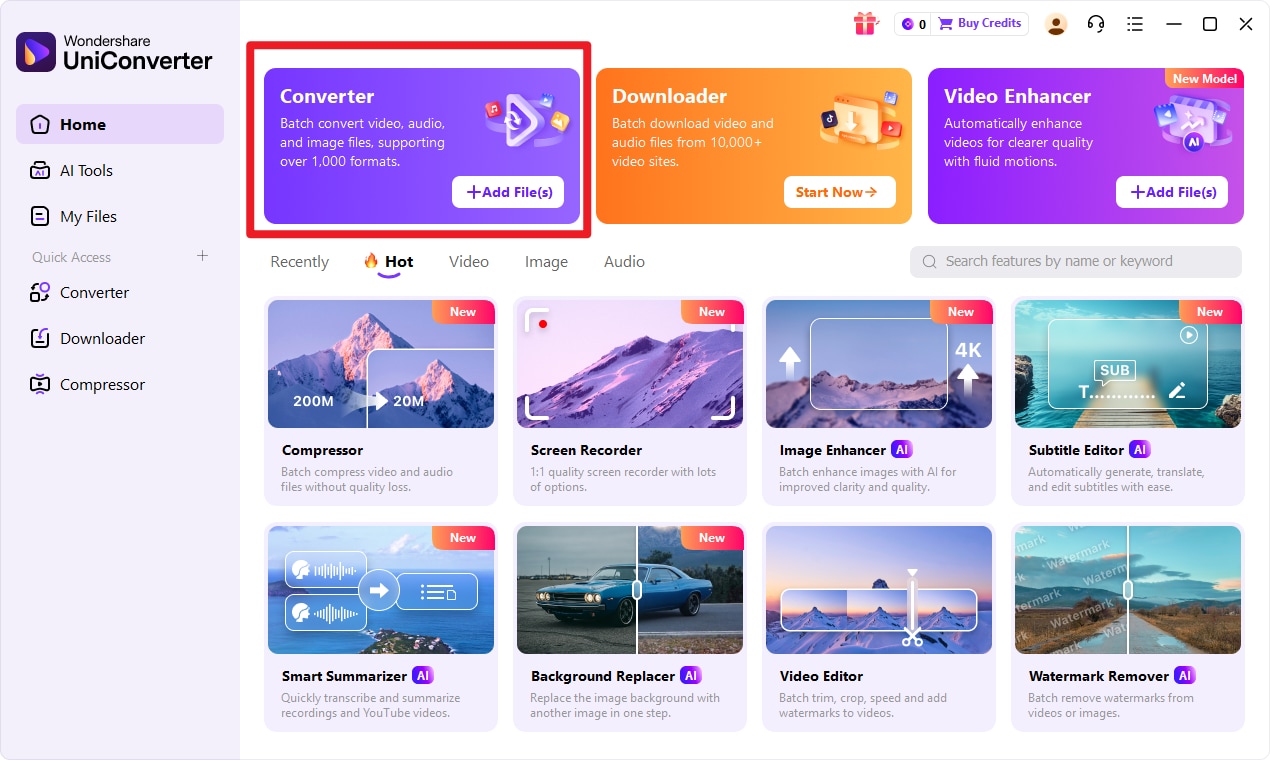
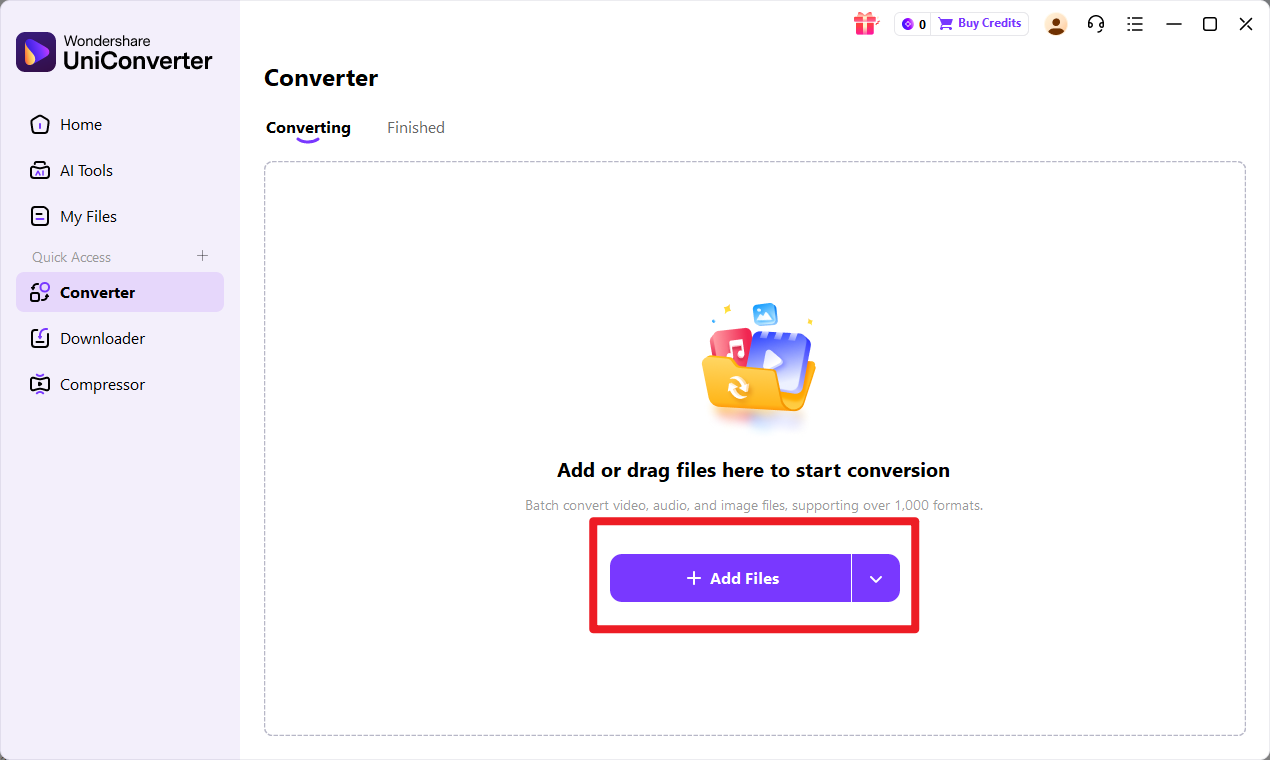
Step 1: Add Files to UniConverter
Launch Wondershare UniConverter on your computer. In the main interface, ensure you are in the Converter section. You can then either click the "Add Files" icon or simply drag and drop your RAW files (e.g., BRAW, R3D, CRM) directly into the program window. The software supports batch processing, so you can add an entire folder of clips at once.
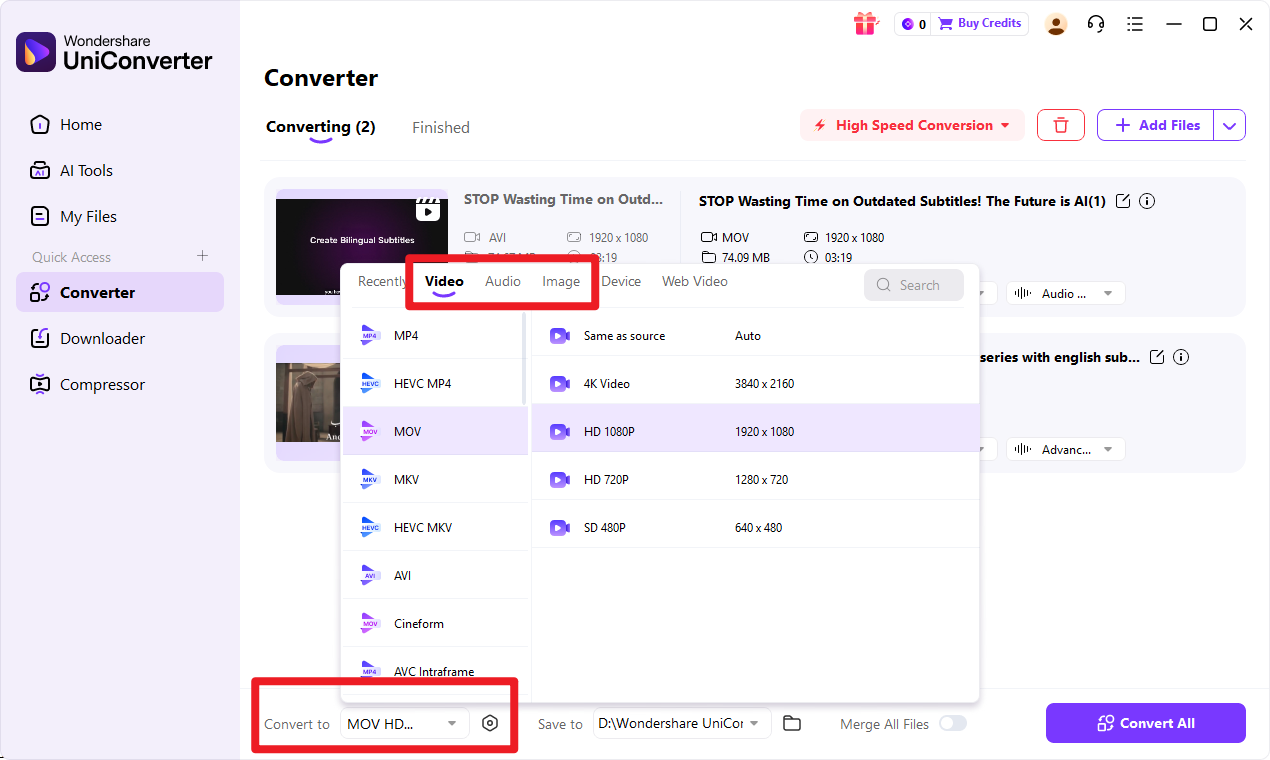
Step 2: Choose Output Format
At the bottom of the window, click on the Output Format menu. This will open a new dialog box. Navigate to the Video tab. From the list of formats on the left, select Apple, and then from the list on the right, choose your desired ProRes variant. For most proxy workflows, ProRes 422 or ProRes 422 HQ are excellent choices.
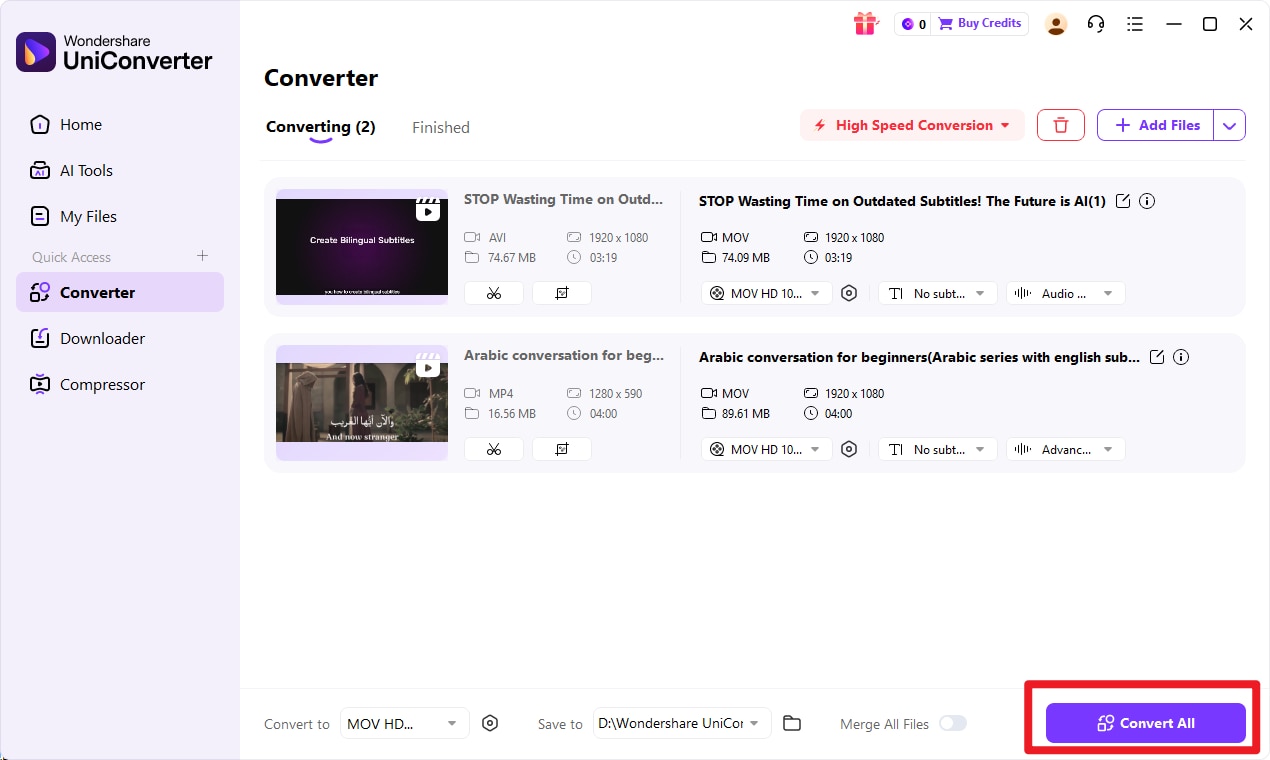
Step 3: Start the Conversion
Before starting, you can specify where you want to save your converted files using the File Location menu at the bottom. Once you have set your output format and destination, simply click the Start All button in the bottom-right corner. UniConverter will begin converting all the files in your queue.
Step 4: Check Converted Files
UniConverter utilizes your computer's GPU acceleration to make the conversion process as fast as possible. Once the process is complete, you can find your new, edit-ready ProRes files by navigating to the Finished tab at the top of the window. From here, you can open the file location directly and import your new clips into your editing software.

More Than Just a RAW to ProRes Converter
Conclusion
Ultimately, the ProRes vs RAW debate doesn't have a single winner. The choice is not about which format is universally superior, but which is the right tool for your specific job. The decision should be guided by the needs of your project, the capabilities of your equipment, and the constraints of your timeline and budget.
- Choose RAW when your absolute top priority is achieving the maximum possible image quality and having unparalleled flexibility in post-production. This is the choice for cinema, high-end VFX, and projects where the final look will be meticulously crafted in a color grade. Be prepared for the associated large file sizes and demanding hardware requirements.
- Choose ProRes when you need a robust, reliable, and efficient workflow that still delivers pristine, professional-grade image quality. It's perfect for fast-turnaround projects, online content, and situations where storage and editing performance are significant considerations.
In modern filmmaking, it's increasingly common for both formats to be used together in a hybrid workflow. By shooting in RAW and creating ProRes proxies for editing, professionals get the ultimate combination of final quality and post-production efficiency.
FAQs
-
1. Is RAW always better quality than ProRes?
Not necessarily in a visual sense. RAW contains more underlying data, which provides more flexibility for manipulation in post-production. However, a high-bitrate format like ProRes 4444 XQ can be visually indistinguishable from the original RAW source for many applications. "Better" truly depends on whether you need the data flexibility of RAW or the performance efficiency of ProRes. -
2. Can you edit RAW video on a laptop?
Yes, it is possible in 2026, but it requires a very powerful, modern laptop equipped with a high-end dedicated GPU, a fast processor, and ample RAM. More importantly, you'll need extremely fast internal or external SSD storage to handle the high data rates. For most laptop users, the experience will be far smoother and more productive by converting RAW files to ProRes proxies using a tool like Wondershare UniConverter. -
3. Does shooting in ProRes save time?
Yes, absolutely. Shooting in ProRes saves a significant amount of time in post-production. The files are edit-ready the moment they are transferred to your computer, eliminating the time-consuming step of transcoding footage or generating proxies before you can begin your creative edit. This can save hours or even days on a tight schedule. -
4. What is the best software to convert RAW to ProRes?
While professional editing suites can create proxies, they can often be slow and complex. For users who need a fast, reliable, and easy-to-use solution specifically for conversion, Wondershare UniConverter is an excellent choice. It supports a wide range of professional and RAW camera formats, offers simple batch-processing capabilities, and uses full GPU acceleration to convert files much faster than many other programs, making it an invaluable tool in any video workflow.
