
Navigating the world of video production involves understanding a host of technical terms, and few are as fundamental yet confusing as interframe vs. intraframe compression. These two methods form the backbone of how digital video is stored, edited, and shared. Choosing the wrong one can lead to frustratingly large files, choppy editing playback, or compromised final quality. Whether you're a seasoned video editor, a film student, or a content creator looking to optimize your workflow, grasping the difference between these compression techniques is crucial for making informed decisions that balance quality, file size, and performance.
This guide is designed to demystify interframe and intraframe compression. We will break down these complex concepts into simple, practical terms, helping you understand how they work, their distinct advantages and disadvantages, and exactly when to use each one for professional results. By the end, you'll be equipped to choose the perfect compression setting for every stage of your video project, from initial capture to final delivery.
In this article, you will learn:
- What intraframe and interframe compression are and how they work.
- A direct comparison of their key characteristics in a simple table.
- Which compression method is better for quality, file size, and editing.
- Practical use cases for both intraframe and interframe compression.
- How to easily convert between formats for a smoother workflow.
Part 1. What is Intraframe? What is Interframe?
At its core, video compression is about reducing the amount of data needed to represent a video file, making it smaller and more manageable. Intraframe and interframe are two fundamentally different philosophies for achieving this goal.
What is Intraframe Compression?
Intraframe compression, also known as spatial compression or "All-I," treats every single frame of a video as a complete, standalone image. Think of it like a digital photo album where each page is a high-quality JPEG. Each frame is compressed independently of the frames that come before or after it.
This method only looks for redundant information within a single frame to reduce its size. Because every frame contains all the visual information required to display it, the video file is self-contained on a frame-by-frame basis. This leads to several key characteristics:
- High Quality: Since each frame is a complete picture, the visual integrity is very high. There are fewer compression artifacts that can result from predicting information across frames.
- Large File Size: Storing every frame as a complete image requires a lot of data. Consequently, intraframe-compressed files are significantly larger than their interframe counterparts.
- Easy to Decode: Computers and editing software can process intraframe footage with ease. To display or edit any given frame, the system only needs to read that one frame. This results in smooth scrubbing, fast seeking, and responsive editing performance.
Common examples of codecs that primarily use intraframe compression include Apple ProRes, Avid DNxHD/HR, and GoPro CineForm.
What is Interframe Compression?
Interframe compression, also known as temporal compression, takes a more efficient but complex approach. Instead of storing every frame as a complete image, it analyzes a group of pictures (GOP) and only saves the differences between them. It works by establishing a full-quality keyframe and then recording only the changes that occur in subsequent frames.
This process relies on three types of frames:
- I-frames (Intra-coded frames): These are the keyframes. Like in intraframe compression, an I-frame is a complete, self-contained image. A video stream starts with an I-frame, and they are placed at regular intervals throughout the clip.
- P-frames (Predicted frames): These frames are much simpler. They only contain data about what has changed from the previous I-frame or P-frame. For example, if a person is walking against a static background, the P-frame only needs to store the data for the moving person, not the entire background.
- B-frames (Bi-directional predicted frames): These are the most efficient frames. They can look both backward and forward, referencing data from previous and future I-frames or P-frames to describe the image with the least amount of data possible.
By eliminating this temporal redundancy, interframe compression achieves its primary goal: creating much smaller files. However, this efficiency comes at a cost. To display a P-frame or B-frame, the computer must first decode the reference I-frame and then apply the changes, making it more computationally intensive.
Part 2. Quick Comparison Table
To make the differences even clearer, here is a side-by-side comparison of intraframe and interframe compression.
| Feature | Intraframe Compression | Interframe Compression |
| Compression Method | Compresses each frame individually (spatial compression). | Compresses a group of frames by saving only the differences between them (temporal compression). |
| File Size | Very large. | Very small and efficient. |
| Video Quality | Generally higher, with fewer artifacts. Preserves maximum detail. | Good to excellent, but can introduce artifacts at low bitrates. Quality is dependent on the GOP structure and bitrate. |
| Editing Performance | Excellent. Smooth scrubbing, cutting, and playback. | Poor to fair. Can be laggy and slow to respond, especially when scrubbing or making precise cuts. |
| CPU Usage (Decoding) | Low. Easy for the computer to process. | High. Requires significant processing power to reconstruct frames. |
| Common Codecs | Apple ProRes, Avid DNxHD/HR, All-I (H.264/H.265), Motion JPEG. | H.264 (AVC), H.265 (HEVC), VP9, AV1, MPEG-2. |
Part 3. Intraframe vs. Interframe: Which One Is Better?
The question of which compression method is "better" has no single answer. The best choice depends entirely on what you are trying to accomplish. It's a classic trade-off between quality, file size, and performance.
The Trade-off: Quality vs. File Size
This is the most significant difference between the two methods.
Intraframe prioritizes quality above all else. By storing every frame in full detail, it creates a robust, high-fidelity file that serves as a digital negative. This makes it the ideal choice for creating master copies or archival footage where preserving the maximum amount of information is the top priority. The downside is the massive file sizes, which can quickly fill up hard drives and require faster storage media.
Interframe prioritizes file size efficiency. Its ability to discard redundant information between frames results in files that are dramatically smaller—often 50 to 100 times smaller than their intraframe equivalents. This incredible efficiency is what makes video streaming over the internet possible. While there can be a slight loss in quality compared to an intraframe master, modern interframe codecs like H.265 are so advanced that the difference is often imperceptible to the human eye, especially at high bitrates.
Editing and Post-Production: The Clear Winner
When it comes to the editing timeline, there is a clear winner: intraframe.
Video editing requires constant jumping, scrubbing, and cutting. With intraframe footage, every frame is a complete picture. When you drag the playhead to a new position, the software can instantly display that frame. This results in a fluid, responsive, and enjoyable editing experience. You can make frame-accurate cuts with confidence because what you see is exactly what's there.
Editing interframe footage, on the other hand, can be a frustrating and laggy process. When you jump to a P-frame or B-frame in the middle of a Group of Pictures (GOP), your computer can't just display it. It has to find the nearest preceding I-frame and then calculate all the changes for every P- and B-frame in between. This reconstruction process happens in real-time and puts a heavy strain on your CPU, leading to stuttering playback, delayed responses, and the dreaded spinning wheel. This is why many professional editors convert their interframe camera files into an intraframe format (known as creating proxies or intermediates) before they begin editing.
Streaming and Delivery: Efficiency is Key
For any form of online distribution, interframe is the undisputed champion.
Imagine trying to stream a movie using intraframe compression. The file would be so enormous that only users with the fastest internet connections could watch it without constant buffering. Interframe compression is the engine that powers the modern streaming era. Platforms like YouTube, Netflix, and Hulu, as well as video conferencing services like Zoom and Teams, all rely on highly efficient interframe codecs (like H.264 and H.265) to deliver smooth video to millions of users simultaneously. The small file sizes save immense amounts of bandwidth for both the provider and the viewer, making high-quality video accessible to everyone.
Part 4. Use Cases for Intraframe and Interframe
Understanding the theory is one thing; applying it is another. Here's a practical breakdown of when to use each compression type in your workflow.
When to Use Intraframe Compression
Choose intraframe when quality and editing performance are your top priorities and large file sizes are not a major concern.
- Professional Video Acquisition: High-end cinema cameras often record in intraframe formats like ProRes RAW or Blackmagic RAW. This captures the maximum amount of data from the sensor, providing the most flexibility for color grading and visual effects in post-production.
- Creating Intermediate Files: This is a critical step in a professional workflow. After ingesting footage from a camera that records in an interframe format (like most DSLRs and mirrorless cameras), editors convert it to an intraframe "mezzanine" codec like Apple ProRes or Avid DNxHR. This makes the editing process vastly smoother.
- Archiving Master Footage: For long-term storage of a finished project, an intraframe master file is the best choice. It ensures you have a high-quality, robust copy that is not dependent on a complex decoding process and will be easily accessible with future technology.
When to Use Interframe Compression
Choose interframe when small file sizes and delivery efficiency are more important than editing performance.
- Final Delivery for Web and Streaming: When your edit is complete, you should export the final video using an interframe codec like H.264 or H.265. This will create a file that is small enough to upload quickly and stream smoothly on platforms like YouTube, Vimeo, and social media.
- Recording Long Events: If you are recording a conference, a lecture, or a long interview where storage space is limited, using your camera's interframe setting is a practical choice. It will allow you to record for hours without swapping memory cards constantly.
- Live Streaming and Video Calls: All live streaming applications use interframe compression to transmit video over the internet in real-time. Its efficiency is essential for maintaining a stable connection and minimizing latency.
Part 5. Step-by-Step Guide to Convert Interframe to Intraframe Using UniConverter
For video editors, a common and essential task is converting highly compressed interframe files (like the H.264 files from a drone or mirrorless camera) into an editing-friendly intraframe format (like ProRes). This conversion creates a smoother post-production experience. Wondershare UniConverter is an excellent tool that makes this process fast and simple.
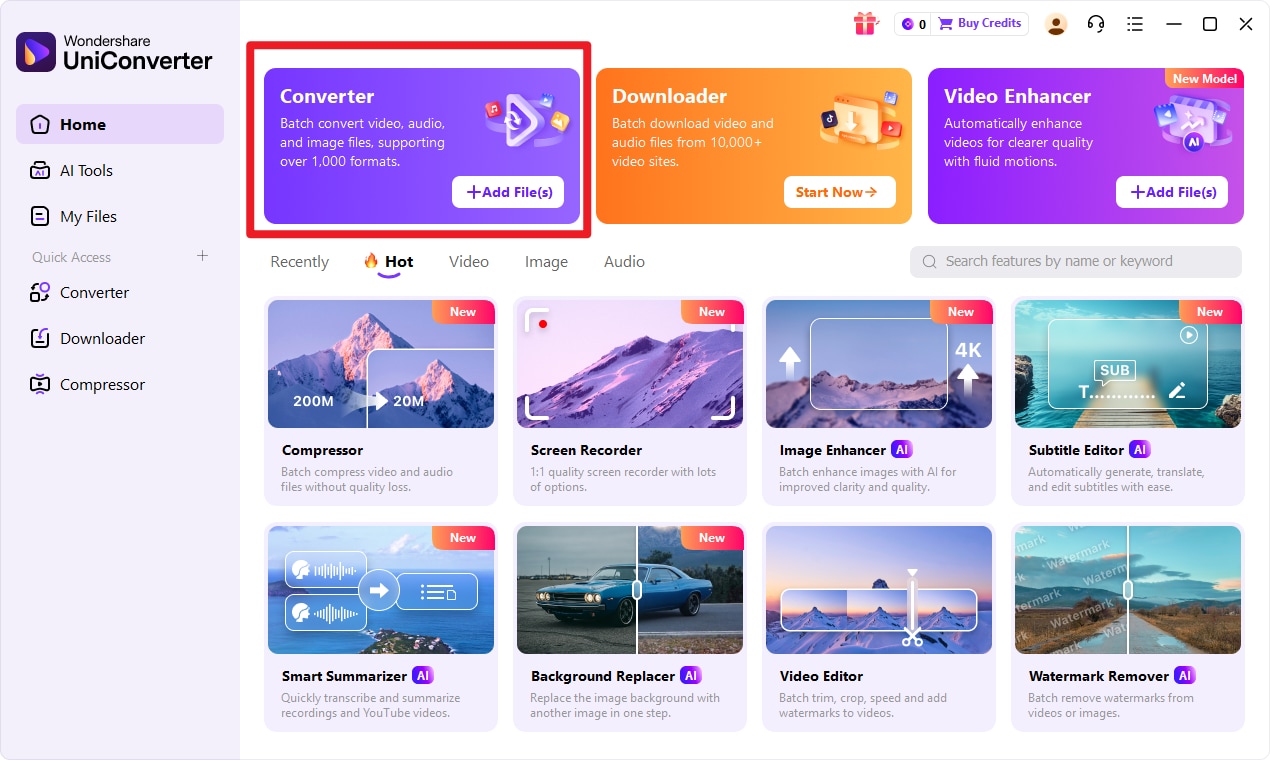
Step 1: Choose Converter in UniConverter
Launch Wondershare UniConverter on your computer. From the main menu on the left side of the screen, click on the Converter tool to open the conversion interface.
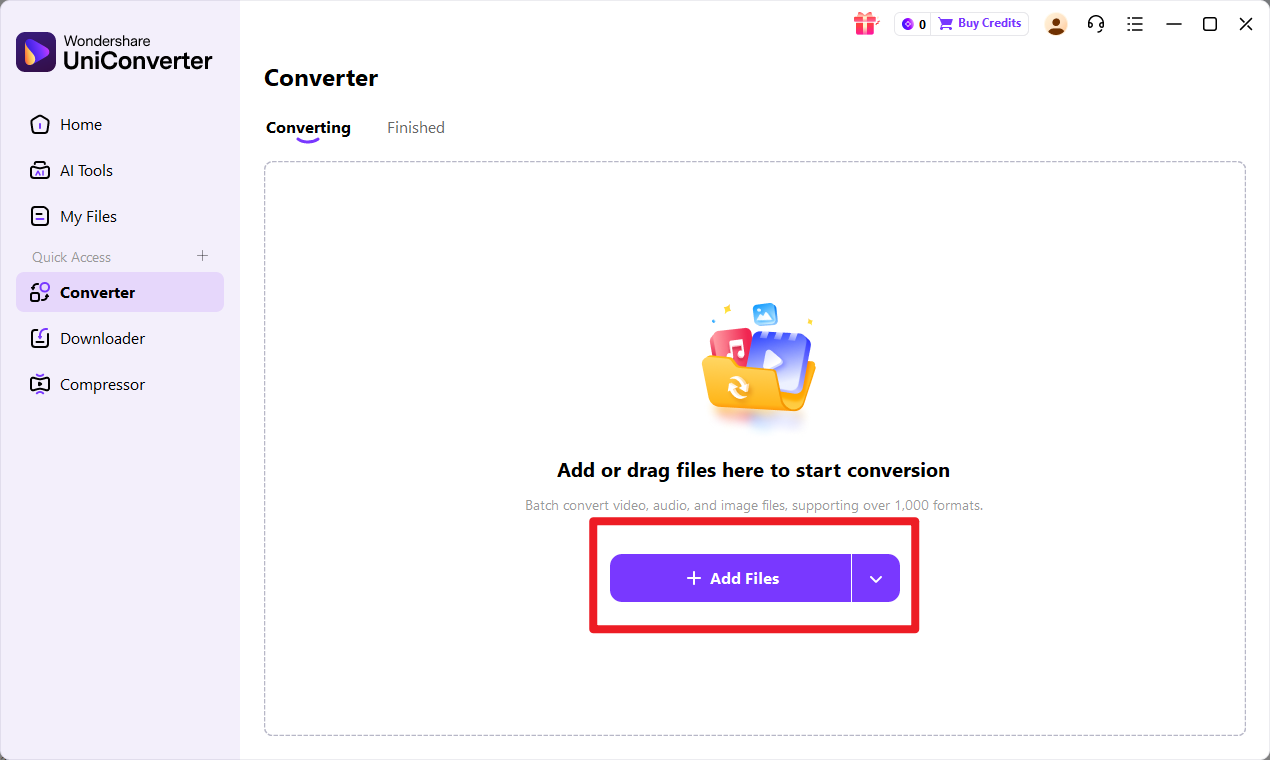
Step 2: Add Files to UniConverter
Drag your input format video file directly into the UniConverter window. Alternatively, you can click the Add Files button in the top-left corner to browse your computer's folders and import the video you want to convert.
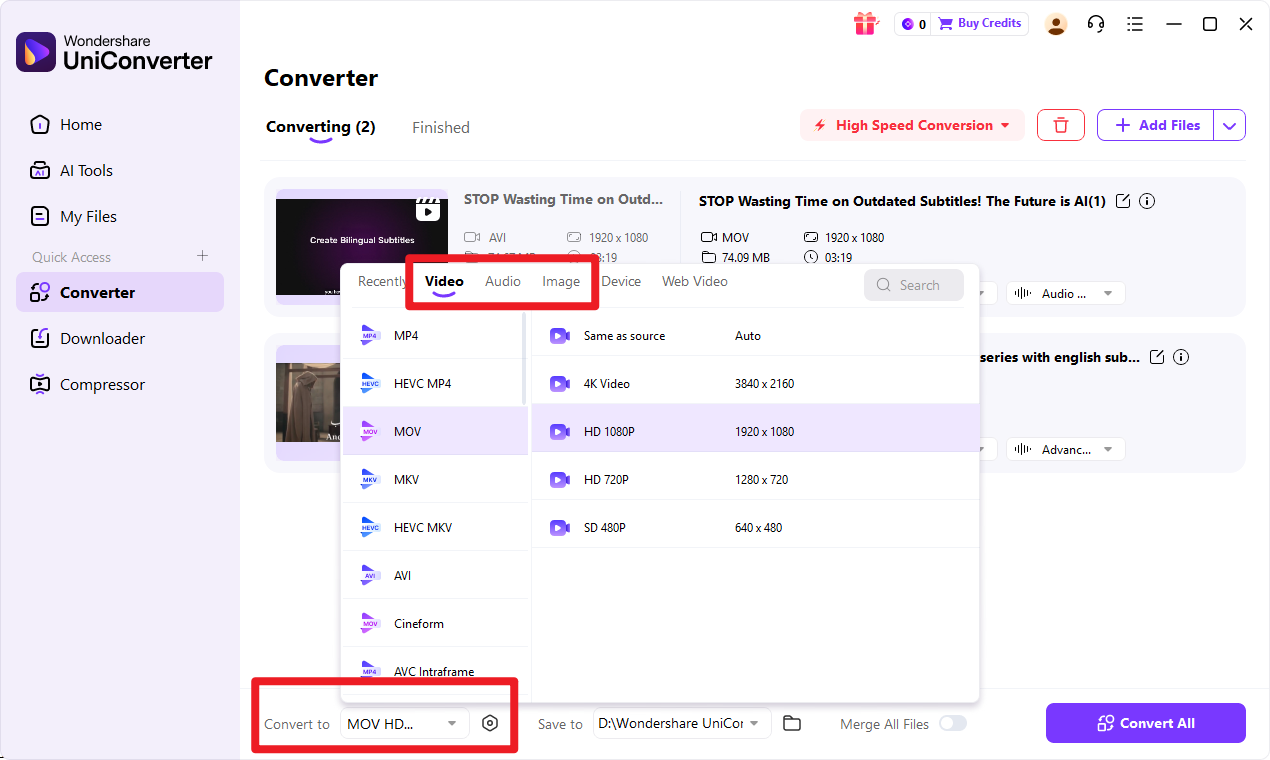
Step 3: Choose Output Format
At the bottom of the window, click on the Output Format menu. A new window will appear. Go to the Video tab and select an editing-friendly target format, such as ProRes, from the list on the left. You can then choose a specific resolution and quality preset on the right.
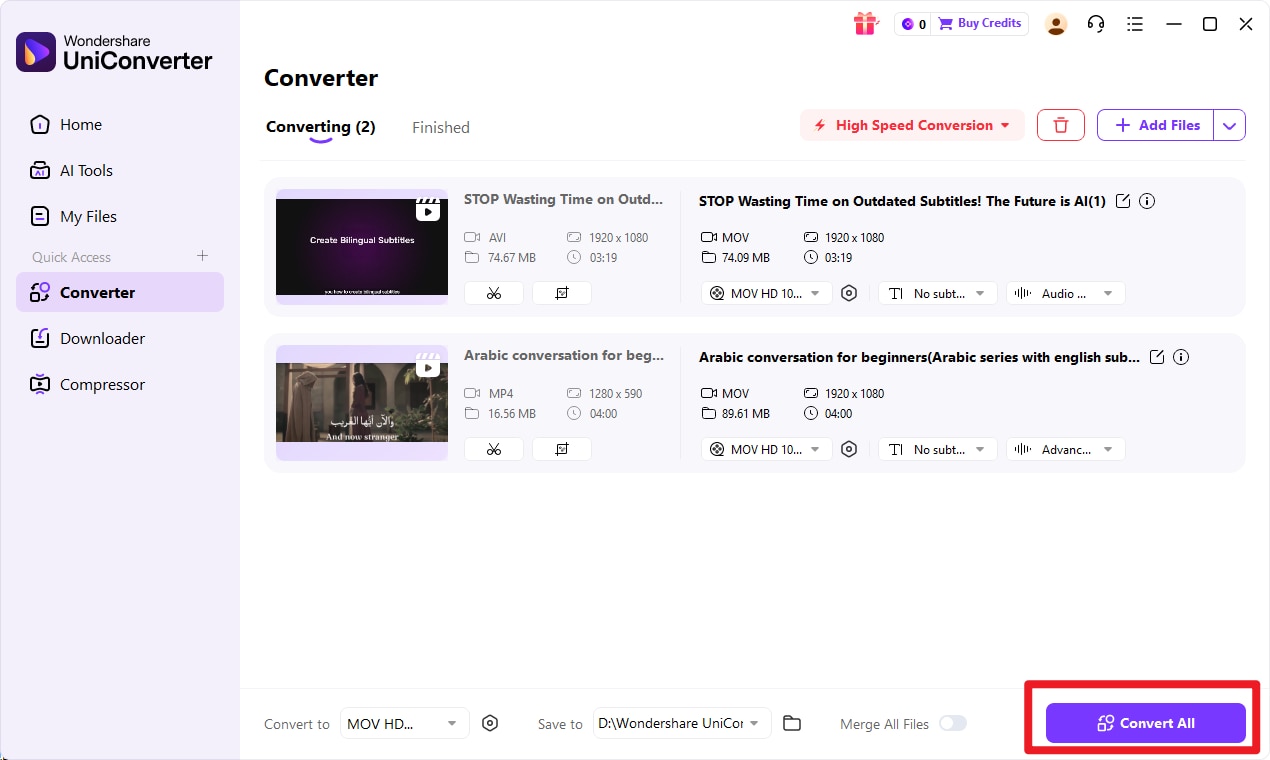
Step 4: Start the Conversion
Finally, select a destination folder for your new file by using the File Location option at the bottom. Once you are ready, click the Convert button to start the process. If you have added multiple files, you can click Start All to convert them in a batch.

Your All-in-One Video Toolkit
Conclusion
Understanding the interframe vs. intraframe debate is key to mastering your video workflow. Neither method is inherently superior; they are simply different tools for different jobs. Intraframe compression is your go-to choice for capturing pristine quality, archiving master files, and ensuring a buttery-smooth editing experience, though it comes at the cost of very large file sizes. Interframe compression is the workhorse of delivery, providing incredible file size efficiency that makes streaming, sharing, and storing video practical for everyday use.
Ultimately, the right choice depends on where you are in the production process. You might capture in an interframe format, convert to intraframe for editing, and then export back to an interframe format for final delivery. By leveraging the strengths of both, you can create a flexible and efficient workflow. With powerful tools like Wondershare UniConverter, you can effortlessly switch between these formats, empowering you to use the right compression for the right task, every time.
FAQs
-
1. Is intraframe the same as ALL-I?
Yes, they are effectively the same. ALL-I is a specific setting found in the menu of many cameras (particularly from brands like Panasonic and Canon). When you select ALL-I, you are instructing the camera to use an intraframe compression scheme, where every single frame is recorded as a complete I-frame. -
2. Does YouTube use interframe or intraframe compression?
YouTube uses highly efficient interframe compression. When you upload a video, YouTube re-encodes it using advanced interframe codecs like H.264 (AVC) and VP9 (and increasingly, AV1). This is essential for minimizing file sizes to save on storage and bandwidth costs, ensuring that videos can be streamed smoothly to millions of viewers across the globe with varying internet speeds. -
3. Is Apple ProRes an intraframe or interframe codec?
Apple ProRes is a family of intraframe codecs. This is precisely why it is one of the most popular and preferred formats for professional video editing, especially in software like Final Cut Pro, Adobe Premiere Pro, and DaVinci Resolve. Because every frame is self-contained, editing ProRes files is incredibly fast and responsive. -
4. How can I convert my video for easier editing?
The best way to make your video easier to edit is to convert it from a delivery-focused interframe format (like H.264 or H.265) to an editing-focused intraframe format (like Apple ProRes or Avid DNxHR). You can do this using a dedicated video converter application. A highly recommended tool for this task is Wondershare UniConverter, which provides presets specifically for editing formats and makes the conversion process quick and straightforward.
