
Have you ever downloaded a video file, tried to play it, and been met with a frustrating error message? Or perhaps you've exported a project from your video editor, only to find the file is enormous or won't upload to YouTube. These common problems often stem from a fundamental misunderstanding of how video files are constructed. The two terms at the heart of this confusion are "codec" and "container." While they sound technical, understanding the difference between a codec vs container is the key to mastering your video workflow, solving playback issues, and optimizing your files for any purpose.
This guide will demystify these concepts using simple language and clear analogies. You'll learn not just what they are, but how they work together and how to choose the right combination for your projects. By the end, you'll be able to handle video files with confidence, ensuring they play perfectly everywhere, every time.
In this article
Part 1. What is a Codec? What is a Container?
To truly grasp the relationship between a codec and a container, it's best to understand each component individually. Think of them as two essential partners that must work together to create a playable video file. One is responsible for the content itself, and the other is responsible for packaging it.
What is a Codec (The Language)
The word "codec" is a portmanteau of Coder-Decoder. As the name implies, a codec is a piece of software or an algorithm with two primary jobs:
1. Coding (Compressing): When you create or export a video, the codec takes the massive amount of raw visual data and compresses it into a much smaller, more manageable size. Without compression, a few minutes of high-quality video could take up hundreds of gigabytes.
2. Decoding (Decompressing): When you play a video, the codec on your device reads the compressed data and decompresses it in real-time, turning it back into the images and sounds you see and hear on your screen.
Essentially, a codec is the "language" used to write and read the video data. It determines how efficiently the video is stored and how much quality is retained after compression.
Common Codec Examples:
- H.264 (AVC): The most widely used codec on the planet, known for its excellent balance of quality, file size, and universal compatibility.
- H.265 (HEVC): The successor to H.264, offering roughly double the compression efficiency. It's ideal for 4K and 8K video, as it produces smaller files at the same quality.
- AV1: A modern, open-source, and royalty-free codec developed by the Alliance for Open Media (founded by Google, Amazon, Netflix, etc.). It offers even better compression than H.265.
- ProRes: An Apple-developed codec popular in professional video editing. It uses minimal compression to preserve maximum image quality during the editing process, resulting in very large files.
- VP9: A free and open-source codec developed by Google, commonly used for streaming on YouTube.
What is a Container (The Box)
If the codec is the language, the container is the "box" or "wrapper" that holds everything together. A container is a file format that bundles all the different elements of a multimedia presentation into a single, synchronized file.
A video file isn't just moving pictures. It contains multiple data streams, and the container's job is to organize them. These streams typically include:
- The video track (which has been compressed by a codec).
- One or more audio tracks (also compressed by an audio codec like AAC or MP3).
- Subtitles or closed captions.
- Metadata (information like the video's title, creation date, camera settings, and chapter markers).
The file extension you see (e.g., `.mp4`, `.mov`, `.mkv`) usually indicates the container format, not the codec inside. This is a major source of confusion. Just because a file is an MP4 doesn't automatically tell you which codec was used to compress the video within it.
Common Container Examples:
- MP4 (MPEG-4 Part 14): The most universal container format. It's supported by virtually every device, browser, and platform, making it the go-to choice for web and social media.
- MOV (QuickTime File Format): Developed by Apple, this container is the standard in the macOS and iOS ecosystem, particularly for software like Final Cut Pro and QuickTime.
- MKV (Matroska): A flexible, open-standard container that is popular for its ability to hold an unlimited number of video, audio, and subtitle tracks in a single file.
- AVI (Audio Video Interleave): An older container format developed by Microsoft. While still functional, it has limitations compared to modern formats like MP4.
- WMV (Windows Media Video): Another Microsoft-developed format, primarily used within the Windows ecosystem.
The Perfect Analogy: A Shipping Crate
To tie it all together, let's use a simple analogy. Imagine you are shipping a book, a translated audio guide, and a set of instructions overseas.
- The Container is the shipping crate. It's the physical box that holds all the items. This is your MP4, MOV, or MKV file.
- The Codec is the language the book is written in. The book itself is the video data. If it's written in English (like the H.264 codec), many people worldwide can read it. If it's written in a rare dialect (a less common codec), only a few people will be able to understand it.
- The Contents are the items inside the crate. This includes the book (the video stream), the audio guide (the audio stream), and the instructions (the metadata and subtitles).
A delivery service can successfully transport the crate (the container) to its destination. But if the recipient can't read the language the book is written in (the codec), the contents are useless. This is exactly what happens when your device supports the MP4 container but not the specific HEVC codec used inside it.
Part 2. Quick Comparison Table
Here is a quick comparison table summarizing the key differences between a codec and a container to help you visualize their distinct roles.
| Feature | Codec | Container |
| Primary Role | To compress and decompress video data | To hold and synchronize all data streams |
| Purpose | To reduce file size and encode video for playback | To act as a wrapper for the multimedia content |
| Examples | H.264, H.265 (HEVC), ProRes, AV1 | MP4, MOV, MKV, AVI |
| Analogy | The language a book is written in | The physical book cover and binding |
Part 3. Codec vs Container: Which One Is Better?
A common question that arises from this topic is, "Which is better, a codec or a container?" This, however, is the wrong question to ask. It's like asking what's more important for a car: the engine or the chassis? You need both for the car to function.
Why They Are Not Competitors
Codecs and containers are not competitors; they are partners that perform different but equally essential functions. You cannot have a playable video file without both.
- A codec without a container is just a stream of compressed data with no timing or synchronization information.
- A container without a codec is an empty box—it has a structure but no content to display.
The relationship is hierarchical: the container holds the video stream, and the video stream is encoded by the codec. Therefore, the debate is never about choosing one over the other.
The Real Question: Which Codec and Container Combination Is Best?
The more practical and important question is: "Which combination of codec and container is best for my specific needs?" The answer depends entirely on what you want to do with your video. Here are some of the most effective and widely used pairings in 2026:
- H.264 Codec within an MP4 Container: This is the undisputed king of compatibility. This combination will play on virtually any modern device, browser, or platform. It's the universal standard for uploading to YouTube, Instagram, Facebook, and for general web streaming. It offers a fantastic balance between file size and visual quality.
- H.265 (HEVC) Codec within an MP4 or MOV Container: This is the go-to choice for high-resolution content. If you're shooting and delivering 4K or 8K video, using the HEVC codec will result in a file that is significantly smaller than its H.264 equivalent, saving you storage space and bandwidth. While its compatibility is very good, it's not quite as universal as H.264 yet.
- ProRes Codec within a MOV Container: This is a professional-grade combination used primarily during the video editing phase. ProRes preserves incredible detail and color information, which is crucial for color grading and applying effects. Because it uses very light compression, the files are massive and not suitable for streaming or sharing. Editors typically work with ProRes/MOV files and then export the final product to H.264/MP4 for delivery.
How to Identify a Video's Codec and Container
So, how can you check what's inside your video file?
One way is to use a versatile media player like VLC. You can open a file, go to "Window" > "Media Information," and then navigate to the "Codec Details" tab to see all the streams. However, this can be a bit clunky.
A much simpler method is to use a dedicated video toolkit. Tools like Wondershare UniConverter can analyze any video file and display its technical details in a clean, easy-to-read format. You can simply import a file, and it will instantly show you the container format, video codec, audio codec, resolution, and more, taking all the guesswork out of the process.
Part 4. Use Cases for Codecs and Containers
Choosing the right codec and container is a practical decision. Your choice will impact file size, quality, and, most importantly, where your video can be played. Here's a breakdown of when to choose specific options.
When to Choose a Specific Codec
Your choice of codec is primarily about balancing three factors: quality, file size, and compatibility.
- Choose H.264 (AVC) for Maximum Compatibility: If your top priority is ensuring your video plays everywhere for everyone, H.264 is the safest and most reliable choice. It's the standard for web content, social media, and corporate videos.
- Choose H.265 (HEVC) for High-Resolution Delivery: When you are working with 4K or 8K footage and need to keep file sizes manageable without sacrificing quality, HEVC is the superior option. It's perfect for streaming high-quality films or creating future-proof archives of your work.
- Choose ProRes for Professional Editing: If you are in the middle of a video editing project, especially on a Mac, using an intermediate codec like ProRes is essential. It withstands the stress of repeated rendering, color grading, and effects work far better than heavily compressed codecs like H.264, preventing quality degradation.
When to Choose a Specific Container
Your choice of container is more about functionality, ecosystem, and the types of data you need to bundle.
- Choose MP4 for Universal Sharing: This is the best all-around container for final delivery. Its unparalleled support across devices, operating systems, and websites makes it the default choice for exporting videos intended for a wide audience on platforms like YouTube, Vimeo, and Instagram.
- Choose MOV for the Apple Ecosystem: If your entire workflow is based on Apple products (e.g., shooting on an iPhone, editing in Final Cut Pro, and playing on a Mac), sticking with the MOV container is often seamless. It's tightly integrated with Apple's hardware and software and is the native wrapper for ProRes codecs.
- Choose MKV for Flexibility and Archiving: If you need to package a film with multiple language tracks, several different subtitle options, and chapter markers all in one file, MKV is the most powerful and flexible container. It's an excellent choice for creating a comprehensive digital backup of a Blu-ray or a complex video project.
Part 5. Step-by-Step Guide to Convert a Video's Codec and Container Using UniConverter
Now that you understand the theory, let's put it into practice. There are many reasons why you might need to change a video's format.
Why You Need to Change a Video's Codec or Container
- To Solve Compatibility Issues: The most common reason. You have a `.mov` file from a friend's iPhone that won't play on your Windows PC, or a `.mkv` file that won't upload to a web platform.
- To Reduce File Size: You've finished editing a project and have a massive ProRes file that's several gigabytes in size. You need to convert it to a much smaller H.264 MP4 file to email it or upload it to the web.
- To Meet Platform Requirements: Different platforms have different specifications. For example, Instagram prefers H.264 MP4 files with specific bitrates and resolutions. Converting your video ensures it meets these technical requirements for optimal playback.
How to Easily Convert Video Formats with Wondershare UniConverter
Manually changing codecs and containers can seem daunting, but it doesn't have to be. Wondershare UniConverter is a powerful and intuitive tool that simplifies this entire process, allowing you to convert videos between over 1,000 formats. It gives you full control over both the container and the codec in just a few clicks, making it the perfect solution for creators of all skill levels.
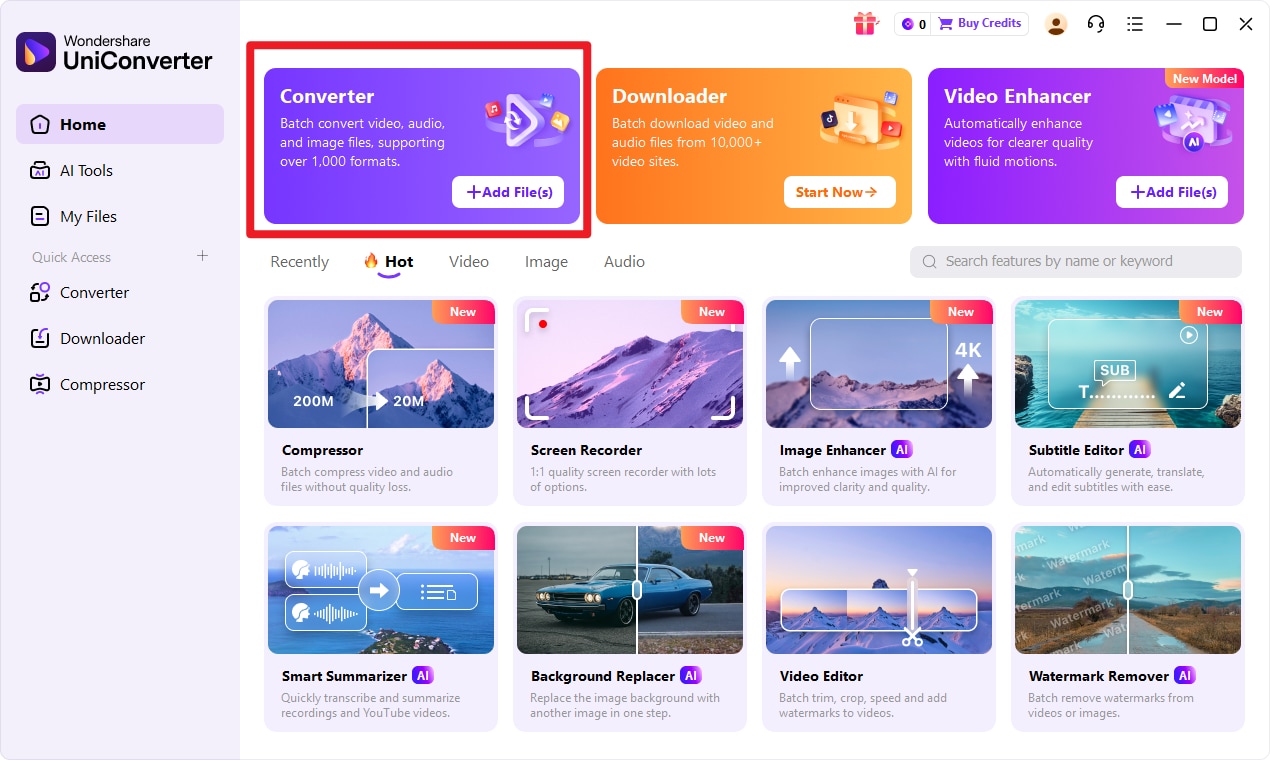
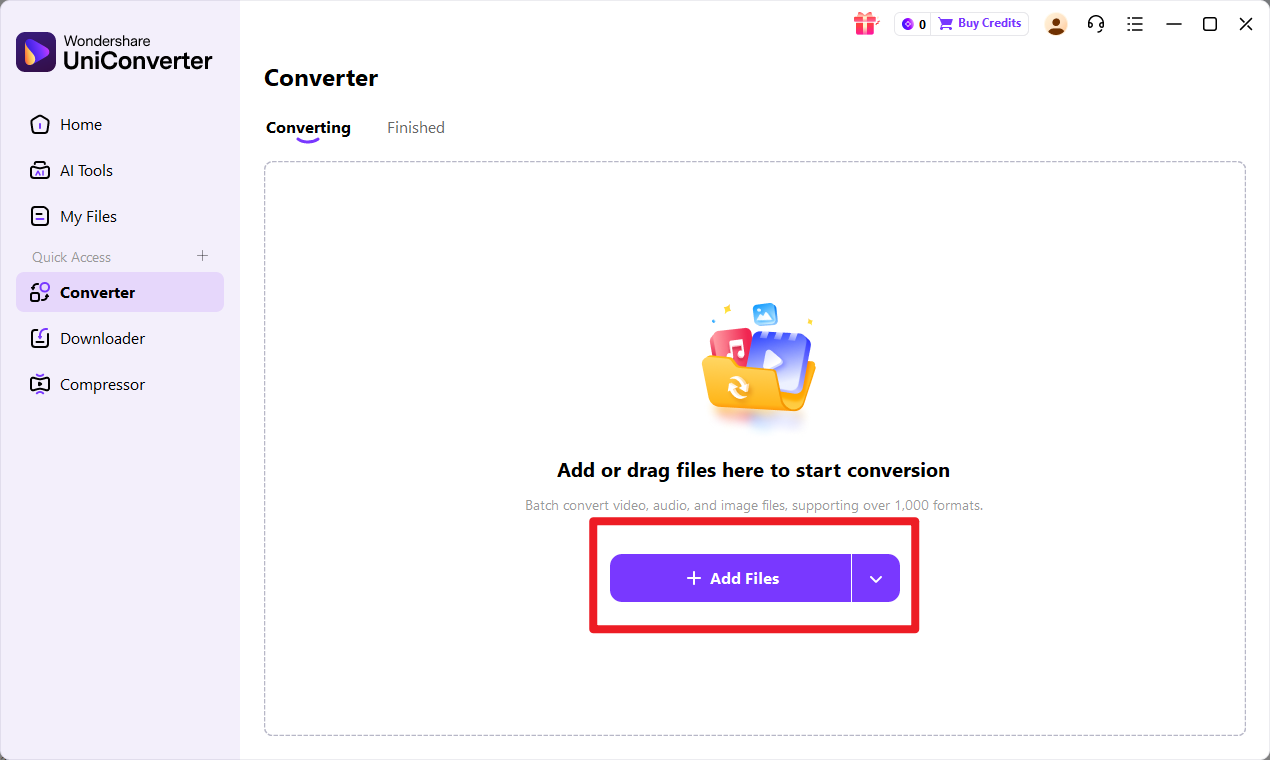
Step 1: Add Your Video to UniConverter
First, launch Wondershare UniConverter on your computer. In the main interface, ensure you are on the "Converter" tab. You can either drag and drop your video file directly into the program window or click the "Add Files" button to browse and import it from your computer.
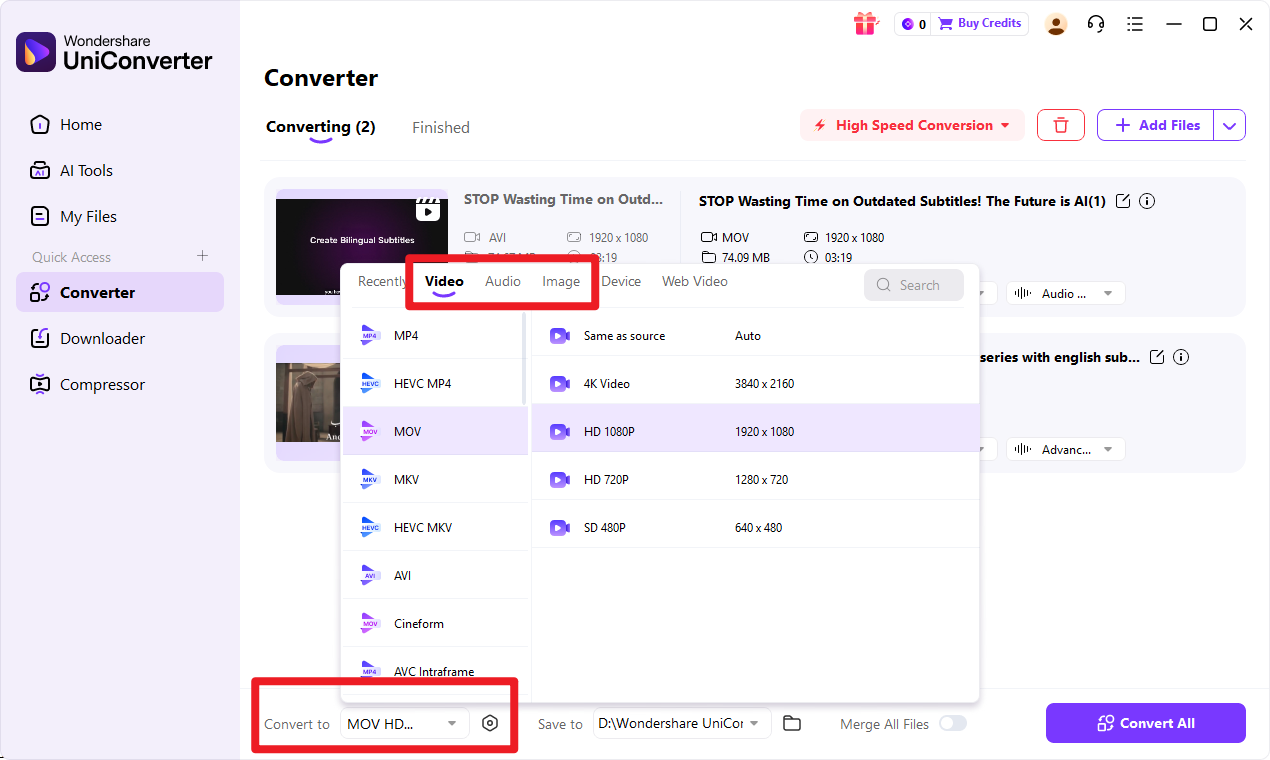
Step 2: Choose the New Output Format
Once your video is loaded, click on the "Output Format" menu located at the bottom of the window. A new panel will appear. Select the "Video" tab. Here, you can choose your desired new container format from the list on the left, such as MP4. On the right, select a preset that matches your needs, like "Same as source" to keep the resolution or choose a new one.
Step 3: Fine-Tune the Codec Settings (Optional)
For more advanced control, you can customize the codec directly. Next to the resolution preset you selected, click the small "Edit" (pencil) icon to open the "Settings" window. Here, under the "Video" section, you'll find a dropdown menu for "Encoder." You can change it from H.264 to H.265 (HEVC) or another available codec. You can also adjust the bitrate, frame rate, and other parameters to fine-tune the balance between quality and file size. Click "Create" to save your custom preset.
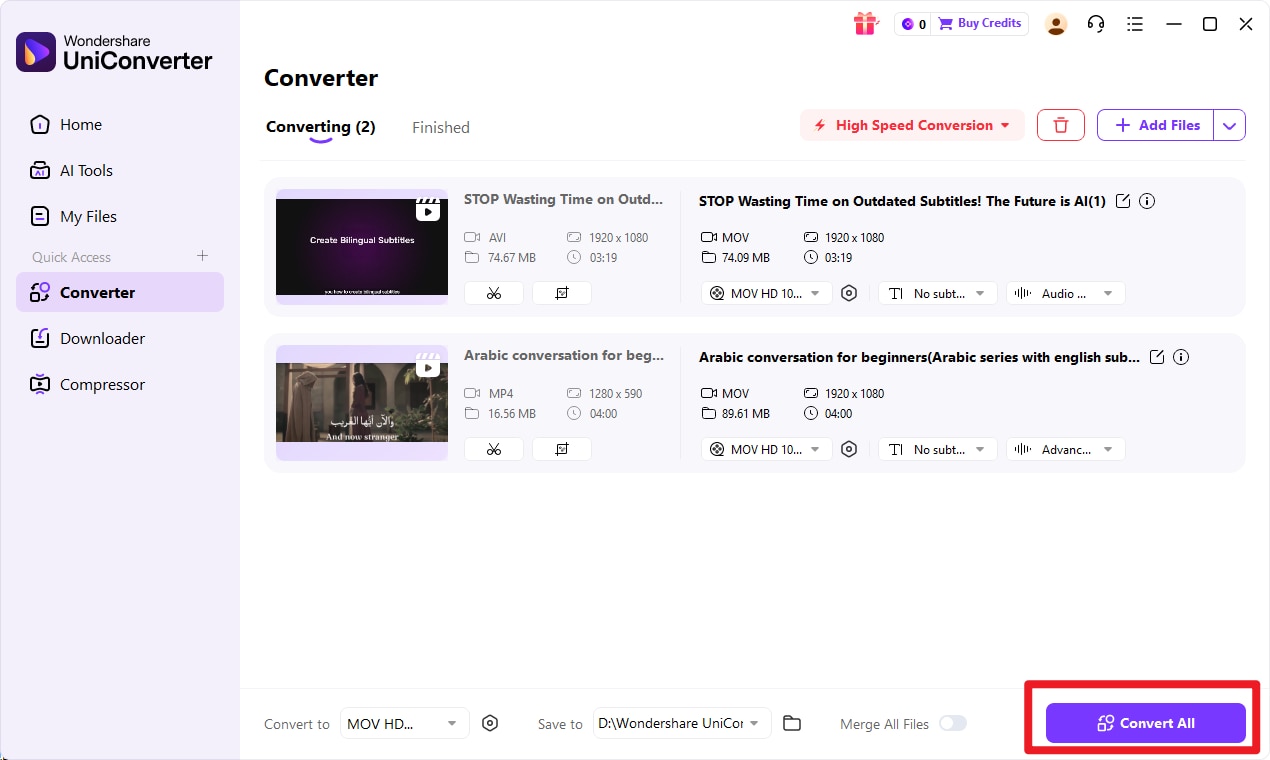
Step 4: Start the Conversion Process
Finally, at the bottom of the main window, select a destination for your converted file under "File Location." Once you're ready, click the "Convert" button (or "Start All" if you have multiple files). UniConverter will process your video at high speed, creating a new file with the updated container and codec you selected.

Go Beyond Simple Video Format Conversion
In the codec vs container discussion, the most important takeaway is that they are not adversaries but essential partners in the world of digital video. The codec (like H.264 or ProRes) is the language that compresses and decompresses the visual data, determining its size and quality. The container (like MP4 or MOV) is the box that holds the video, audio, and metadata together in a single, playable file.
Understanding this fundamental difference empowers you to move beyond frustrating playback errors and confusing export settings. It allows you to make informed decisions, troubleshoot problems effectively, and optimize your video files for any platform or purpose, whether it's for professional editing, web streaming, or social media sharing.
For anyone who wants an all-in-one solution to manage, analyze, and convert video files without getting lost in technical jargon, a comprehensive tool like Wondershare UniConverter is the perfect assistant. It simplifies the entire process, putting you in complete control of your video workflow.
FAQs
-
1. Is MP4 a codec or a container?
MP4 is a container format, not a codec. It is one of the most popular container formats because of its wide compatibility. An MP4 file acts as a wrapper that can hold video streams encoded with various codecs, but the most common ones you'll find inside an MP4 file are H.264 (AVC) and H.265 (HEVC). -
2. Can I change a video's codec but keep the same container?
Yes, absolutely. This is a common task for optimizing files. For example, you might have a large MP4 file that uses the older H.264 codec. To save storage space, you can convert it to use the more efficient H.265 (HEVC) codec while keeping the container as MP4. This is easily accomplished with video conversion software like Wondershare UniConverter, which allows you to change the encoder in the format settings. -
3. Why is my video file so large?
A large video file size is primarily determined by three factors: the codec used, the video's bitrate, and its resolution. If your video was exported using a professional editing codec like Apple ProRes or Avid DNxHD, the file will be very large because these codecs prioritize preserving image quality over compression. To significantly reduce its size for sharing or streaming, you should convert it to a distribution codec like H.264 or H.265.
